Billing Macros (ON)
Billing Macros is a feature of Accuro that allows you to combine codes that you use regularly into a Macro. Instead of having to type in all the separate codes, select the appropriate Macro and the codes are added for you.
Note: Only one Macro can be added to a main Claim procedure. If a second Macro is added to the main Claim procedure, it overwrites the first, however multiple Macros can be added to the sub-procedure Claims.
Create a New Billing Macro (ON)
- Click the Accuro Start Menu
 , then Billing, Billing Options, and select Manage Macros. The Macro Manager window is displayed.
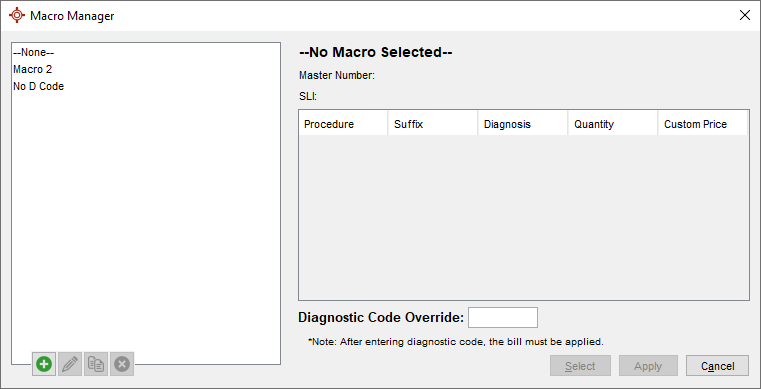
- In the Macro Manager window click the Add button
 to open the Create Macro Window.
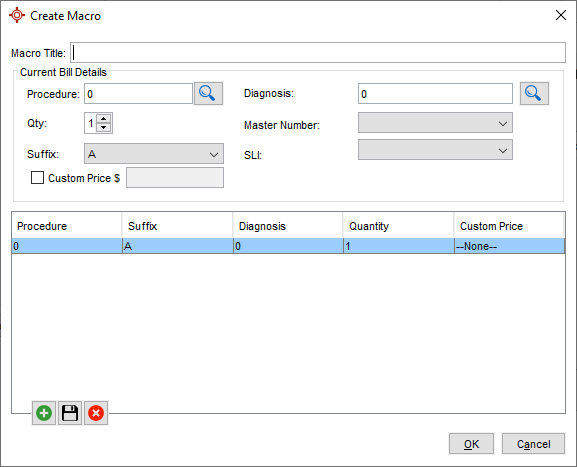
- Enter a Title, Procedure, Diagnosis, Qty, Master Number, Suffix, SLI, and if required, a Custom Price.
- Click the Add button
 to add the above Code to the Macro.
- Repeat Steps 3 and 4 as needed.
- Click OK to save the Macro.
Edit a Billing Macro (ON)
- Click the Accuro Start Menu
 , Billing, Billing Options, and then select Manage Macros.
- Select the Macro you wish to edit.
- Click the Edit button
 .
.
- Edit the Macro as needed.
- Click OK and Close once complete.
Copy a Billing Macro to Create a New Macro (ON)
- Click the Accuro Start Menu
 , Billing, Billing Options, and then select Manage Macros.
- Select the Macro you wish to copy.
- Click the Copy button
 .
.
- Name and Edit the Macro as needed.
- Click OK and Close once complete.
Delete a Billing Macro (ON)
- Click the Accuro Start Menu
 , Billing, Billing Options, and then select Manage Macros.
- Select the Macro you wish to delete.
- Click the Delete button
 .
.
- Name and Edit the Macro as needed.
- Click OK and Close once complete.
Applying a Billing Macro (ON)
Billing Macros can be applied in multiple areas of Accuro. They can be applied through the Claims Section, Claim Details, the Day Sheet, a Query, or in Appointment Details when an appointment type default is linked to a Macro for a specific Provider.
When applying a Billing Macro with no Diagnostic Code, the Provider's Default Diagnostic Code will be applied. If the Provider does not have a Default Diagnostic Code then the code, be it a 0, will apply to the Claim.
Multiple Macros can be selected and applied at the same time by clicking and holding Ctrl on the keyboard.
Note: When a Provider has "Set new Claims to No Charge" enabled in their Provider Wizard then all applied Macros will be set to No Charge in the Claim.
Applying a Billing Macro in the Claims Section (ON)
- Click the Claims button
 on the Accuro Navigation bar.
- Click the Daily Claims or Unsubmitted Claims tab.
- Select a Claim or Multiple Claims at the same time by clicking and holding the Ctrl key.
- Right-click on the appropriate Claim(s) and select Apply Macro from the list displayed.
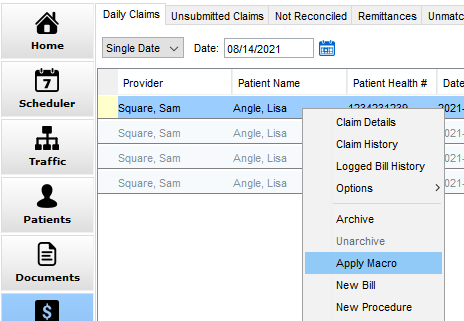
- The Macro Manager window is displayed.

- Click to select the appropriate Macro.
- Click either Select or Select and Apply, as required.
Applying a Billing Macro in Appointment Details (ON)
Note: An Appointment Type needs to be assigned a default Macro per Provider in the Scheduler Management Settings beforehand.
- Select a Patient and Create an Appointment.
- In the Appointment Details window, select the Type dropdown
 to assign an appointment type with an associated Billing Macro.
- Complete all other necessary detail then click OK.
- The Billing Macro linked with that Appointment Type is applied to the Claim created for the respective Appointment.
Applying a Billing Macro in Claim Details (New Bill) (ON)
- Open the Claim Details by:
- Right-clicking an Appointment in the Scheduler and selecting Claim Details.
- Creating a new Claim by pressing Ctrl + B or through the Accuro Start Menu, Billing, New Bill.
- In the Claims Section, right-click on an existing Claim and select Claim Details.
- In the Procedure cell, double click and either type the name of the Macro or when searching the Macros list appears in the search box.
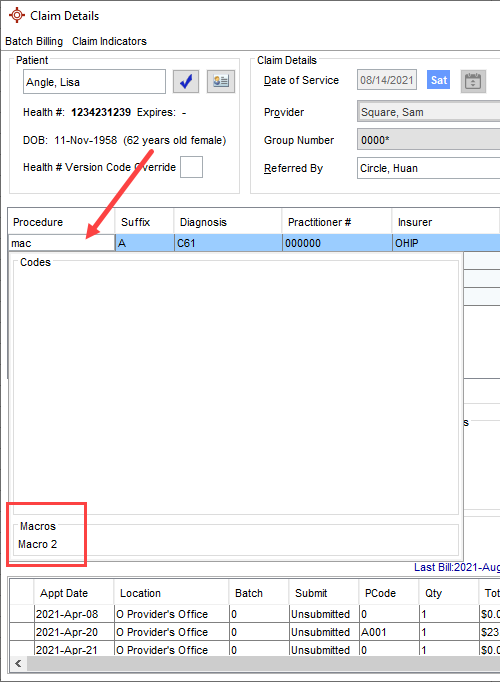
- Click Save and Close to apply the Billing Macro.
Applying a Billing Macro in the Day Sheet (ON)
- Click the EMR button
 on the Accuro Navigation bar.
- Select the Day Sheet tab.
- Select a Claim or multiple Claims at the same time by clicking and holding the Ctrl key.
- Right-click on the appropriate Claim(s) and select Set Macro from the list displayed.
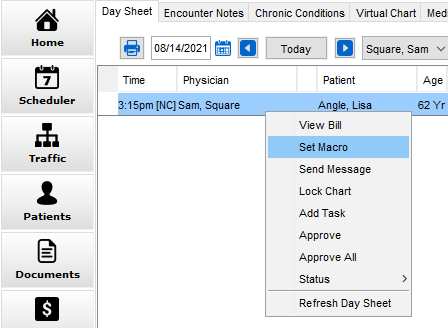
- In the Macro Manager window select the desired Macro.
- Click Select or Apply to add the Macro to the Claim.
Applying a Billing Macro from a Query (ON)
Once a report is generated from a query, a new bill can be created using a Macro.
- Create/select a Query which will be used to apply a Billing Macro for a set of patients.
- Run the Query Report.
- Select one or multiple patients by holding Ctrl while clicking.
- In the -Select Action- dropdown
 select "Create Bill".
- Enter the Date of Service and the Provider.
- Click on Macro.
- Select a Macro or Create a New Macro.
- Click Apply.
- Click Yes in the confirmation window to apply the Billing Macro
Note: Any Diagnostic codes added in the Create Bill window will be overridden by the selected Macro.
 , then Billing, Billing Options, and select Manage Macros. The Macro Manager window is displayed.


 , then Billing, Billing Options, and select Manage Macros. The Macro Manager window is displayed.


 , Billing, Billing Options, and then select Manage Macros.
 .
. , Billing, Billing Options, and then select Manage Macros.
 .
. , Billing, Billing Options, and then select Manage Macros.
 .
.

 to assign an appointment type with an associated Billing Macro.

 select "Create Bill".