Encounter Notes and Forms
The area of the screen in the middle of the Encounter Notes tab contains encounter notes and forms.
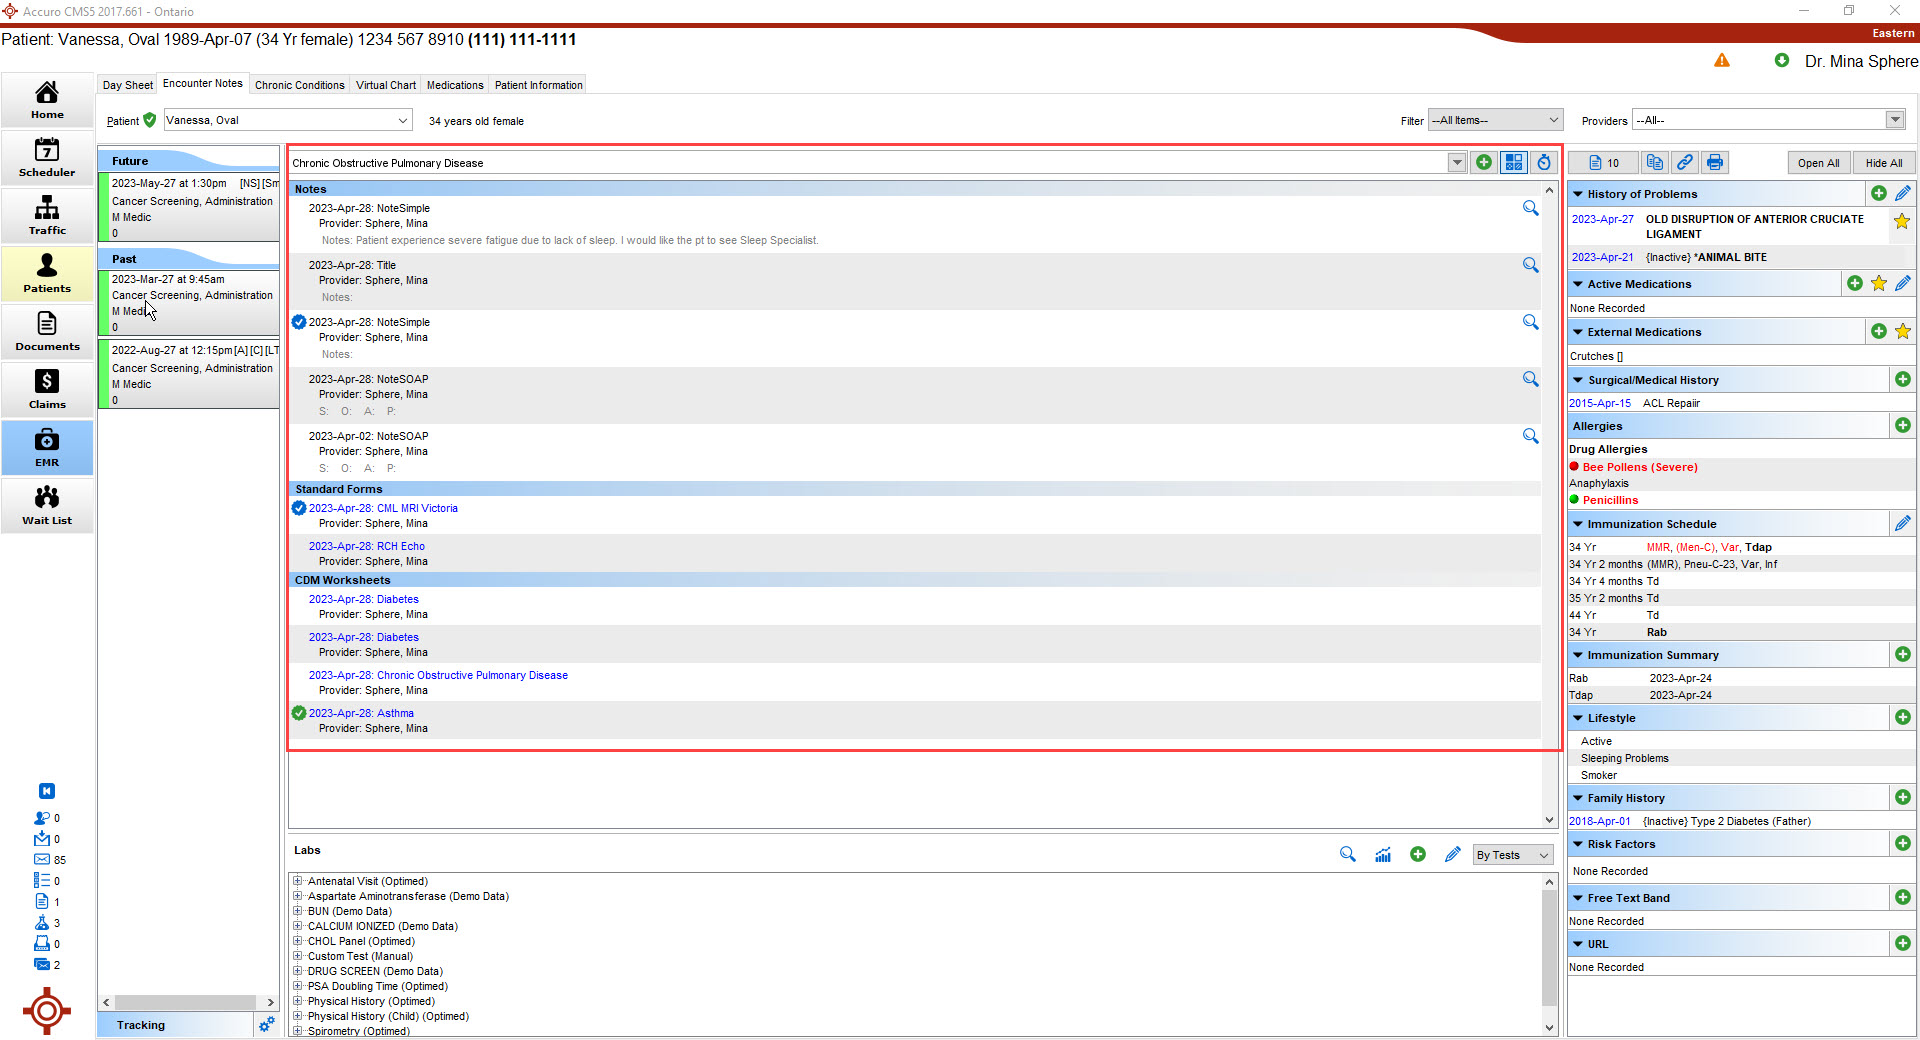
Add button  - Opens the encounter note / form that is selected in the field to add to the patient. See Add Encounter Note or see Add a Form in Encounter Notes for more information.
Sort by Category button  - Sorts the forms and encounter notes that display into categories such as Notes, Standard Forms, and CDM Worksheets.
Sort by Date button  - Sorts the forms and encounter notes that display by date.
Encounter Notes
Add an Encounter Note
- Click the EMR button
 on the Accuro Navigation bar and click the Encounter Notes tab.
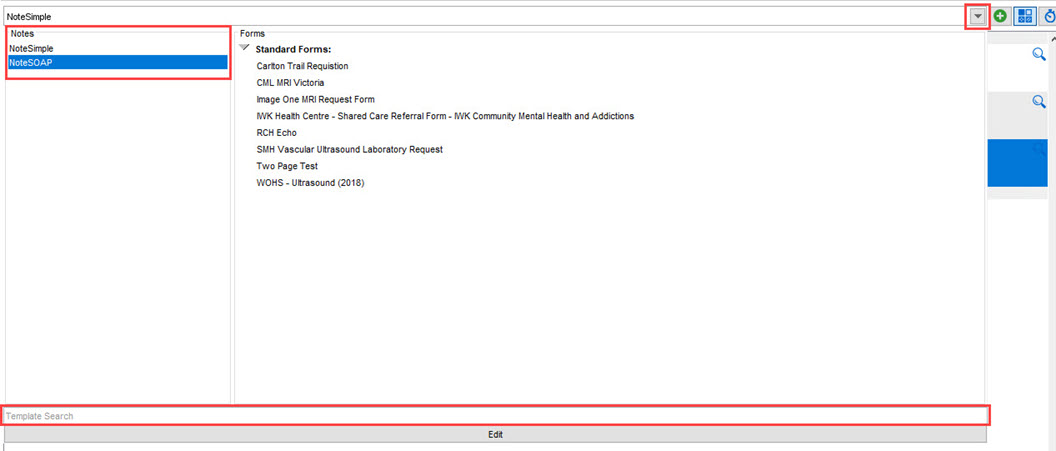
 - In the section in the middle of the screen, click the dropdown list
 and select the Notes template you want to use from the list displayed. You can use the Search field to narrow the displayed information.
Note: See Template Wizard for more information on templates.
- The template you selected opens, complete as required. Type in a title in the Title field, if applicable. If this note is linked to a Diagnosis, click the dropdown list and select the diagnosis from the list displayed. .
Note: If a note is entered for a patient who has an appointment without an Encounter Note attached, you are prompted to select a date of service to attach the letter to. Click the Calendar button to select a date if not displayed. The date with * indicates a date without an appointment.
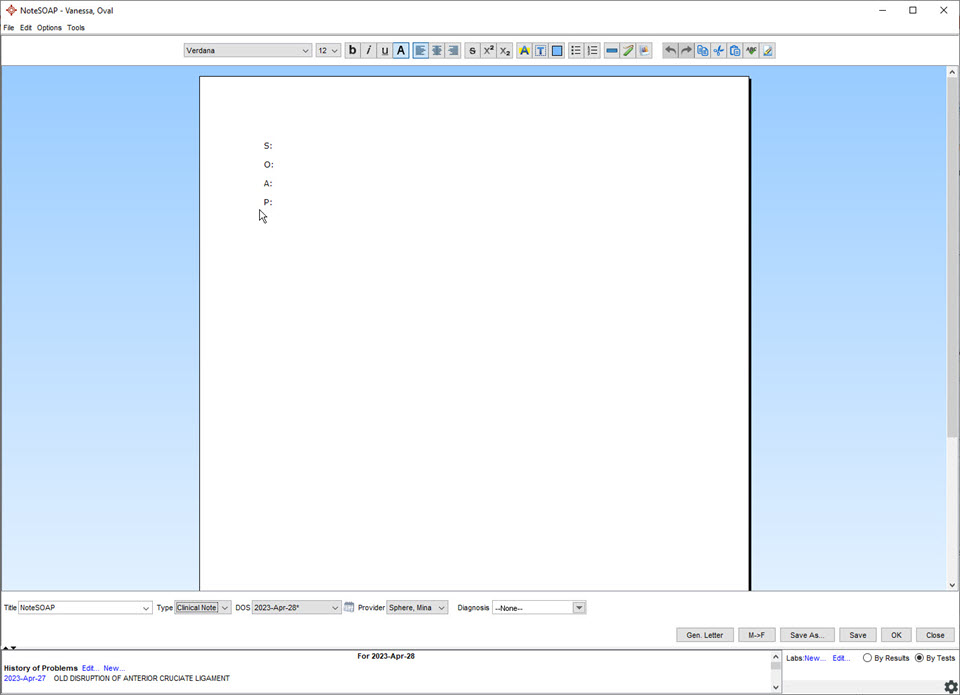
Note: If clicked, the Male to Female button will update all the male pronouns in the template to female pronouns.
- Click Save or OK to save it to the Encounter Notes and Virtual Chart tabs.
If a different title that the template title is desired, click Save As, type in the title, and click OK.
To proceed with Generating a Letter, click the Generate Letter button. See Complete Generate Letter for more information.

- Click Close.
AutoRecovery for Encounter Notes
If you are hosted on Accuro Cloud or ASP, your in-progress Encounter Notes will be backed up. In the event of an unexpected Accuro closure, users will find any open notes with content saved up to 30 seconds before the closure when they log back in.
In the top left corner of an Encounter Note, users will see ![]() which will notify the user that AutoRecovery is enabled.
which will notify the user that AutoRecovery is enabled.
Add an Encounter Note for a "Non-Visit" Date in the Past
The purpose of this feature is to allow notes to be added to a patient's EMR for any after the fact out of the office services. This entry creates its own date and does not affect any dates of service or billing.
- Click the EMR button and select the Encounter Notes tab.
- In the section in the middle of the screen, click the dropdown list and select the Notes template you want to use from the list displayed. You can use the Search field to narrow the displayed information.
Note: See Template Wizard for more information on templates.
- Today's date is displayed with an * after it, this is the option to select the date without affecting DOS or billing. If today's date is correct, click OK otherwise click the Calendar button and select the date in the calendar displayed.
- Click OK to continue.
- The template you selected opens, complete as required. Type in a title in the Title field, if applicable. If this note is linked to a Diagnosis, click the dropdown list and select the diagnosis from the list displayed.
Note: If clicked, the Male to Female buttonwill update all the male pronouns in the template to female pronouns. - Click Save or OK to save it to the Encounter Notes and Virtual Chart tabs.
If a different title that the template title is desired, click Save As, type in the title, and click OK.
To proceed with Generating a Letter, click the Generate Letter button. See Complete Generate Letter for more information.
- Click Close.
Configure Auto Correct in Encounter Notes
Encounter Notes has an auto correct feature. This comes with many commonly miss-spelt words already included. Users can add any new words as they come across them. The list of words in auto correct is global for the clinic so all users have access to the same list. Users have the option of enabling or disabling the auto correct, if required.
- Click the EMR button on the Accuro Navigation bar and click the Encounter Notes tab.
- In the section in the middle of the screen, click the dropdown list and select a Notes template.
- Click Options at the top of the Encounter Note editor window and select Configure Auto Correct.

- The Auto Correct Configuration window displays.
- To enable or disable, toggle the Enable Auto Correct checkbox.
- To edit the Misspellings/Corrections, click the Add button or highlight the desired item and click the Remove button
 .
.
Note: Accuro will only allow a maximum of 30 characters per entry. - Click OK once complete.
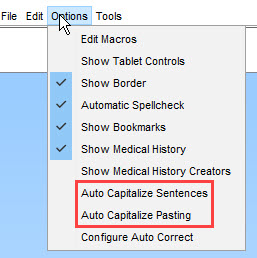
Auto Capitalizing in Encounter Notes
Users can auto capitalize in Encounter Notes. There are two options available:
- Auto Capitalize Sentences: Capitalizes the first letter of new lines and new sentences. This is triggered when the user presses the spacebar or Enter after typing a word.
- Auto Capitalizing Pasting: Checks text when it is being pasted and finds all words at the beginning of a sentence and capitalizes them.
Both of these options are turned off by default. To enable follow the procedure below:
- Click the EMR button on the Accuro Navigation bar and click the Encounter Notes tab.
- In the section in the middle of the screen, click the dropdown list and select a Notes template.
- Click Options at the top of the Encounter Note editor window.
- Select Auto Capitalize Sentences and/or Auto Capitalize Pasting to enable, as required.
Edit an Encounter Note
- Click the EMR button on the Accuro Navigation bar and click the Encounter Notes tab.
- Double-click the desired existing encounter note for the patient and make the desired edits.
- Click Save or OK to save it to the Encounter Notes and Virtual Chart tabs.
If a different title that the template title is desired, click Save As, type in the title, and click OK.
To proceed with Generating a Letter, click the Generate Letter button. See Complete Generate Letter for more information.
- Click Close.
Remove an Encounter Note
- Click the EMR button on the Accuro Navigation bar and click the Encounter Notes tab.
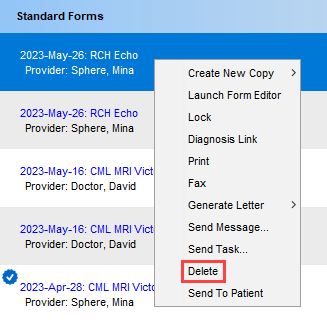
- Right-click the desired existing encounter note for the patient, click Delete and in the confirmation window, click Yes.
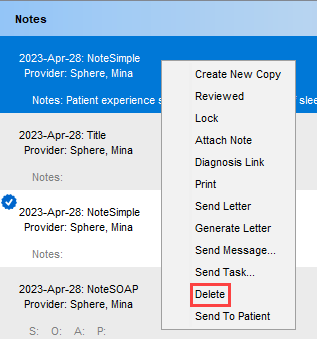
Note: Once an encounter note is reviewed, it is unable to be deleted.
Create a New Copy of an Encounter Note
- Click the EMR button on the Accuro Navigation bar and click the Encounter Notes tab.
- Right-click the desired existing encounter note for the patient and click Create New Copy.
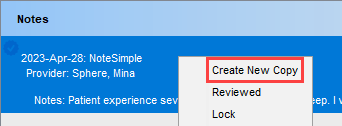
- A copy of the existing Encounter Note will open. Make the desired edits.
- Click Save or OK to save it to the Encounter Notes and Virtual Chart tabs.
If a different title that the original title is desired, click Save As, type in the title, and click OK.
To proceed with Generating a Letter, click the Generate Letter button. See Complete Generate Letter for more information.
- Click Close.
Review an Encounter Note
- Click the EMR button on the Accuro Navigation bar and click the Encounter Notes tab.
- Right-click the desired existing encounter note for the patient and click Reviewed. A Reviewed icon
 will display next to the note.
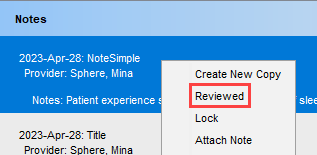
Note: Once an encounter note is reviewed, it is unable to be deleted.
Lock an Encounter Note
- Click the EMR button on the Accuro Navigation bar and click the Encounter Notes tab.
- Right-click the existing encounter note or form for the patient and select Lock from the list displayed.
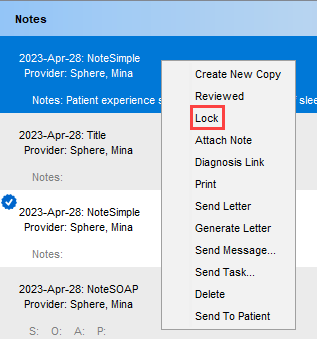
- Click Yes in the Lock Chart Item prompt to lock the encounter note / form.
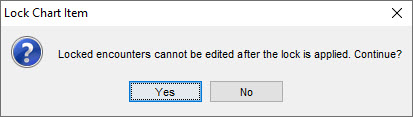
- The lock
 beside the encounter note / form indicates the item is locked.
Note: Only users with the Feature Access "Lock & Review Clinical Notes" enabled have the ability to lock an encounter note / form.
Unlock an Encounter Note
- Click the EMR button on the Accuro Navigation bar and click the Encounter Notes tab.
- Right-click the existing encounter note or form for the patient and select Unlock from the list displayed.
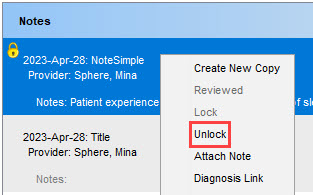
Note: Only users with the Feature Access "Lock & Review Clinical Notes" enabled have the ability to unlock an encounter note / form.
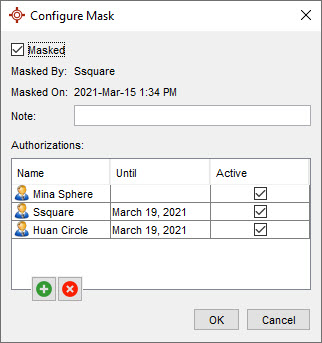
Mask Encounter Note
- Hold down the Alt key and click to select the existing encounter note or form being masked for the patient. The Configure Mask window is displayed.
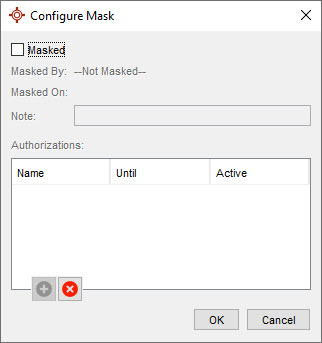
- Click the Masked checkbox. The date, time and person masking the note are automatically completed by Accuro.
- Type in a Note, if required.
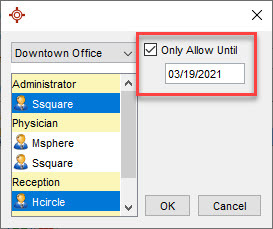
- Click the Add button to authorize other users to view the masked encounter note / form.
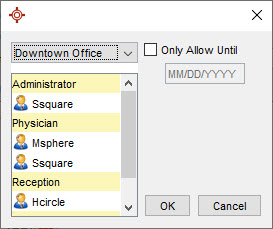
- Select the user to be authorized.
- If there is a date that the encounter note / form can be viewed until before it is masked for this user select the User and click the Add button.
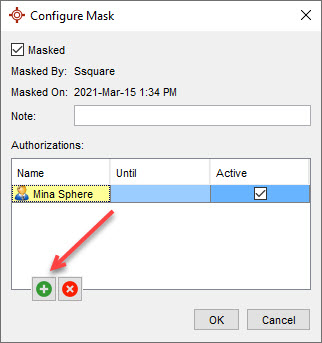
- Click the Only Allow Until checkbox, add the date, and select the appropriate users. Click OK to save any changes.
- The encounter note / form is masked.
- Repeat this procedure from step 5 to allow other users to access this masked encounter note / form. When all users have been added click OK to save the details and mask the encounter note / form.
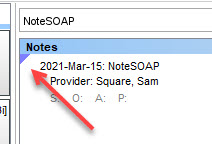
A blue triangle in the corner of the encounter note indicates it is masked. You can only see the encounter note details if you have been granted access.
Note: Only users with the Feature Access "Create & Modify Masks" enabled have the ability to mask an encounter note / form.
Unmask an Encounter Note
- Hold down the Alt key and click to select the masked encounter note or form for the patient. The Configure Mask window is displayed.
- Click to deselect the Masked checkbox.
- Click OK. The Remove Mask window is displayed if the Provider unmasking the encounter note / form is not the original Provider who applied the mask.
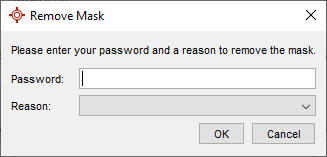
- Type in your Accuro Password.
- Click the dropdown list to the right of Reason and select the reason for unmasking the encounter note / form.
- Click OK. The encounter note / form is unmasked.
Note: Only users with the Feature Access "Create & Modify Masks" enabled have the ability to unmask an encounter note / form.
Add an Addendum to an Existing Encounter Note
- Click the EMR button on the Accuro Navigation bar and click the Encounter Notes tab.
- Right-click the desired existing encounter note the addendum is being added to and select Attach Note.
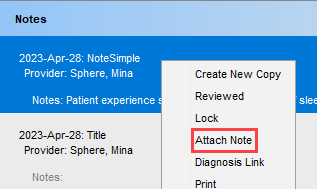
- Type in your note.
- Click OK to save your text.
View an Addendum Added to an Encounter Note
- Click the EMR button on the Accuro Navigation bar and click the Encounter Notes tab.
- Double-click the desired existing encounter note for the patient. The Note window is displayed.
- Click the Addendums Button
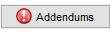 . Any addendums added to the Encounter Note are displayed.
OR - Click Tools on the Note's Menu bar and select Addendums from the list displayed. Any addendums added to the Encounter Note are displayed.
Note: Addendums cannot be added here. - Click Close to exit the Addendum window.
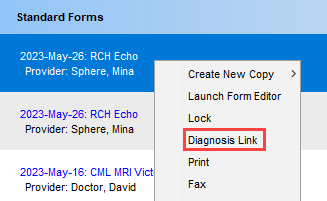
Link Diagnosis to an Encounter Note
A Diagnosis can be link to an encounter note in two ways:
- Click the EMR button on the Accuro Navigation bar and click the Encounter Notes tab.
- Right-click the desired existing encounter note for the patient and click Diagnosis Link. The History of Problems window will display.
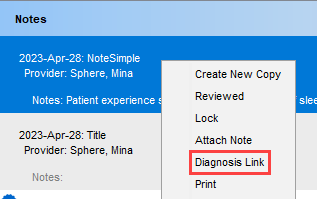
- Select the desired problem to link to the Encounter Note.
- Click Save and Link.
The second way of linking a diagnosis with an Encounter Note is with the following workflow:
- Click the EMR button on the Accuro Navigation bar and click the Encounter Notes tab.
- Double-click the desired existing encounter note for the patient. The Encounter Note will display.
- In the Diagnosis dropdown, select the desired problem to link.
- Save the Encounter Note and then OK.
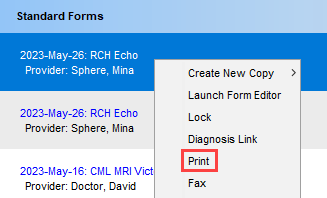
Print an Encounter Note
- Click the EMR button on the Accuro Navigation bar and click the Encounter Notes tab.
- Right-click the desired existing encounter note for the patient and click Print.
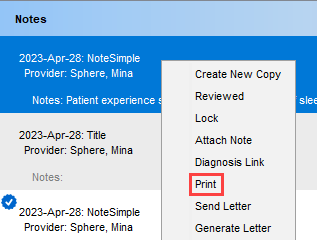
- Select the desired printer and OK.
Generate Letter
Open Letter Generation Window
Opening the Letter Generation window can be accomplished with several different workflows:
- Click the EMR button on the Accuro Navigation bar and click the Encounter Notes tab.
- In the section in the middle of the screen, click the dropdown list and select the Notes template you want to use from the list displayed. You can use the Search field to narrow the displayed information.
Note: See Template Wizard for more information on templates.
- The template you selected opens, complete as required. Type in a title in the Title field, if applicable. If this note is linked to a Diagnosis, click the dropdown list and select the diagnosis from the list displayed.
Note: If a note is entered for a patient who has an appointment without an Encounter Note attached, you are prompted to select a date of service to attach the letter to. Click the Calendar button to select a date if not displayed. The date with * indicates a date without an appointment.
Note: If clicked, the Male to Female buttonwill update all the male pronouns in the template to female pronouns.
- Click Save to save your changes.
- Click the Gen Letter button.
Note: Clicking the Apply button applies any changes made to the body of the letter to the clinical note that the letter was generated from. - Proceed with completing the Generated Letter.
The second way of opening the Letter Generation window can be done with the following workflow or quick key:
- Press and release the Alt Key, type New Clinical Note in the Search field or press Ctrl+F11.
- Click the dropdown list and select the date of service to attach the letter to. Click OK to confirm.
- Click the dropdown list and select the template from the list displayed and click OK to confirm.
- The template you selected opens, complete as required. Type in a title in the Title field, if applicable. If this note is linked to a Diagnosis, click the dropdown list and select the diagnosis from the list displayed.
Note: If a note is entered for a patient who has an appointment without an Encounter Note attached, you are prompted to select a date of service to attach the letter to. Click the Calendar button to select a date if not displayed. The date with * indicates a date without an appointment.
Note: If clicked, the Male to Female buttonwill update all the male pronouns in the template to female pronouns.
- Click Save to save your changes.
- Click the Gen Letter button.
Note: Clicking the Apply button applies any changes made to the body of the letter to the clinical note that the letter was generated from. - Proceed with completing the Generated Letter.
The third way of opening the Letter Generation window can be done with the following workflow.:
- Click the EMR button on the Accuro Navigation bar and click the Encounter Notes tab.
- Right-click the existing encounter note for the patient desired to be a generated letter and select Generate Letter.
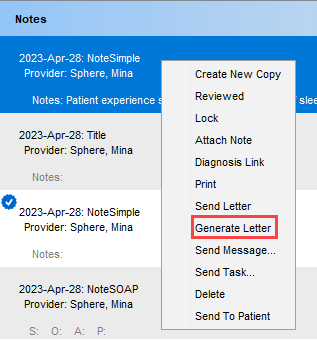
- Proceed with completing the Generated Letter.
The fourth way of opening the Letter Generation window can be done with the following workflow:
- Click the EMR button on the Accuro Navigation bar and click the Encounter Notes tab.
- Right-click the existing encounter note for the patient desired to be a generated letter and select Send Letter.
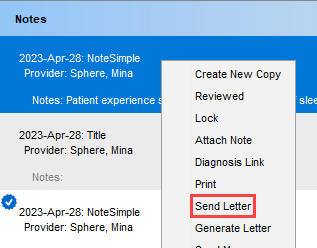
- Proceed with completing the Generated Letter.
Complete Generate Letter
- Open the Letter Generation window.
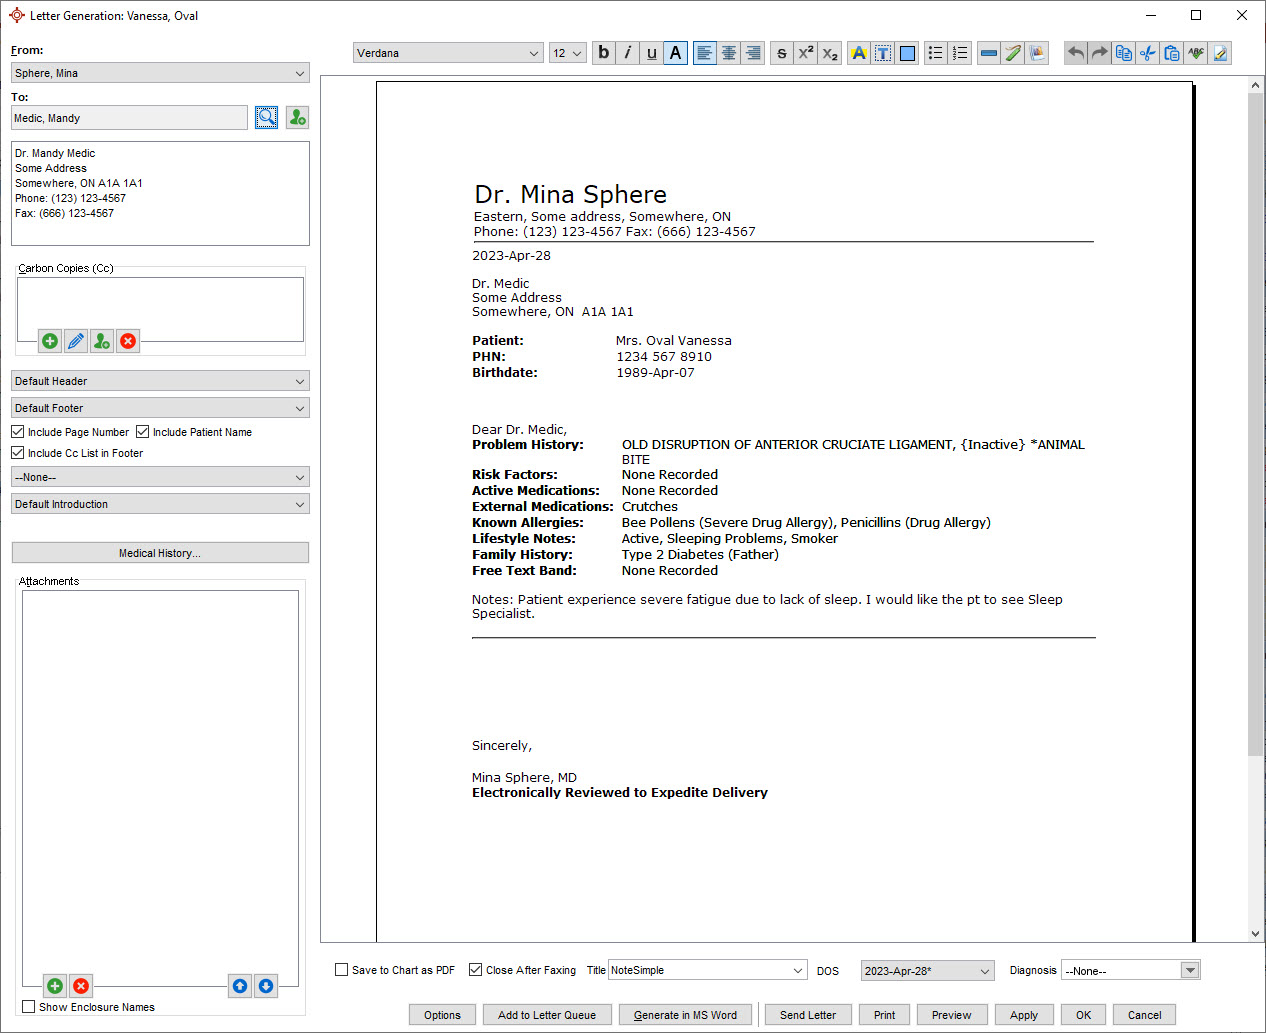
- In the From field, click the dropdown list and select the appropriate Provider.
- In the To field, click the Search button
 and select the letter recipient from the address book displayed.
 - If you would like to send copies to other Providers, click the Add button in the Carbon Copies section and select the appropriate physicians from the address book.
- Click the dropdown list and select the Header.
- Click the dropdown list and select the Footer.
- Click the Include Page Number, Include Patient Name, and /or Include Cc List in Footer, if applicable.
- Click the dropdown list and select a document to attach, if applicable.
- Click the dropdown list and select the Introduction text.
- Click Medical History to add a summary of the patient's Medical History Bands to the letter. See (link to display medical history in letter).
- To attach a document, for example an x-ray, to your letter click the Add button in the Attachments section.
Note: Custom lab summaries can also be attached to generated letters. - Click to select the documents you want to attach and click OK.
- To view what the letter will look like, click Preview.
To add it to the Letter Queue to be sent later, click Add to Letter Queue. Click Options to set a Priority, Status, and Note. See Letter Queue for more information.
To fax the letter, click Send Letter, add a Coversheet, if required, and click Send. To add a Referral Order or Task, click the Referral Letter checkbox. See Create Referral / Task from Generate Letter for more information.
To print the letter, click Print. - Click OK to close the window.
- Once faxed or printed, a copy will appear in the patient's Virtual Chart tab as a Generated Letter.
All corrections should be made from the EMR section and the letter regenerated. Changes made to the body of the letter from the letters section do not save back to the original note.
Display Medical History in Encounter Notes and Generated Letters
There are two ways to display a patient's Medical History in a Generated Letter:
The first is within the Note template used, which can be updated to include Medical History. This can be managed in the Template Wizard.
- Press and release Alt on the keyboard or click the Accuro Start Menu button
 .
. - Click Tools and select Template Wizard.
- Click Display and select the EMR Workflow tab.
- Click the Query button
 and selecting the Medical History tab.
 - Select which History Items to display.
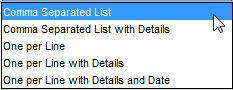
- Select how the information is to be presented. The options are:
- Click OK and Save Changes.
The second way is to add Medical History in the Introduction of Generated Letters.
- Open and complete the Generated Letter.
- Click the Medical History button. The Medical History window is displayed.

- Select the items to be displayed by selecting or deselecting the appropriate checkboxes.
- Select how the information is to be presented. The options are:
- Click OK to save your selection.
Note: Your selections are remembered for the next time you generate a letter.
Create a Referral Order or Task from Generate Letter
- Open and complete the Generated Letter.
- Click Send Letter. The Letter/Fax Recipients window is displayed.
- Click the Referral Letter checkbox.
- Click the down-arrow and select New Referral Order, New Referral Task or select to attach to an existing order that is listed for the patient (these do not have any referral letters attached to them and were created in the Outstanding Requisitions, Referrals and Orders window).
Note: New Referral Task is the old method of processing referrals; New Referral Order creates an entry in the Outstanding Requisitions, Referrals and Orders window (whichever option a user selects is remembered for next time).
Send Message Including an Encounter Note
- Click the EMR button on the Accuro Navigation bar and click the Encounter Notes tab.
- Right-click the existing desired encounter note for the patient and click Send Message.
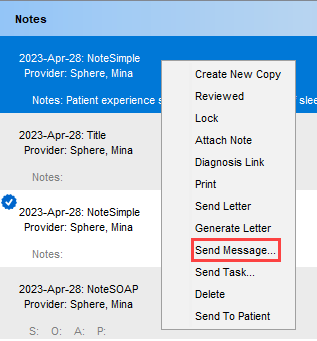
- The New Review Message window will display with the Encounter Note as an attachment.
- Select/enter the Recipient, Subject, Body, and/or Priority as desired.
- Click Send.
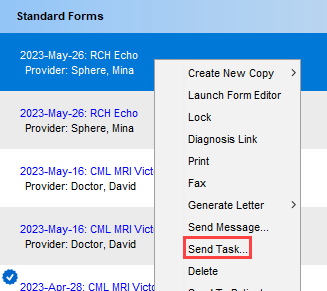
Send Task Including an Encounter Note
- Click the EMR button on the Accuro Navigation bar and click the Encounter Notes tab.
- Right-click the existing desired encounter note for the patient and click Send Task.
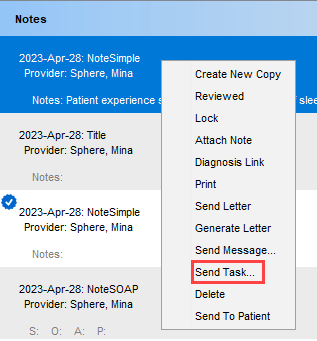
- The New Task window will display with the Encounter Note as an attachment.
- Select/enter the Recipient, Task, Priority, Due Date, and/or Priority as desired.
- Click OK.
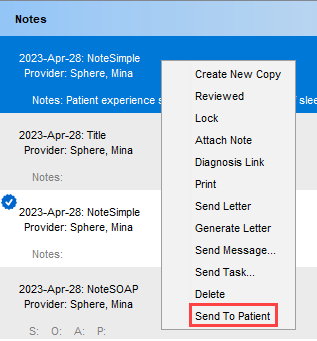
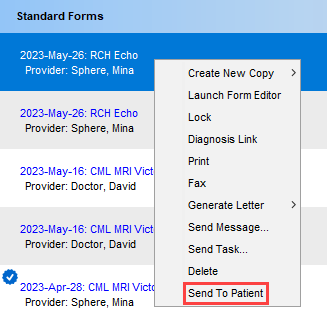
Send an Encounter Note to Patient
Note: This is only applicable to clinics with the Medeo Messaging and HealthMail modules enabled.
- Click the EMR button on the Accuro Navigation bar and click the Encounter Notes tab.
- Right-click the desired existing encounter note for the patient and click Send to Patient.
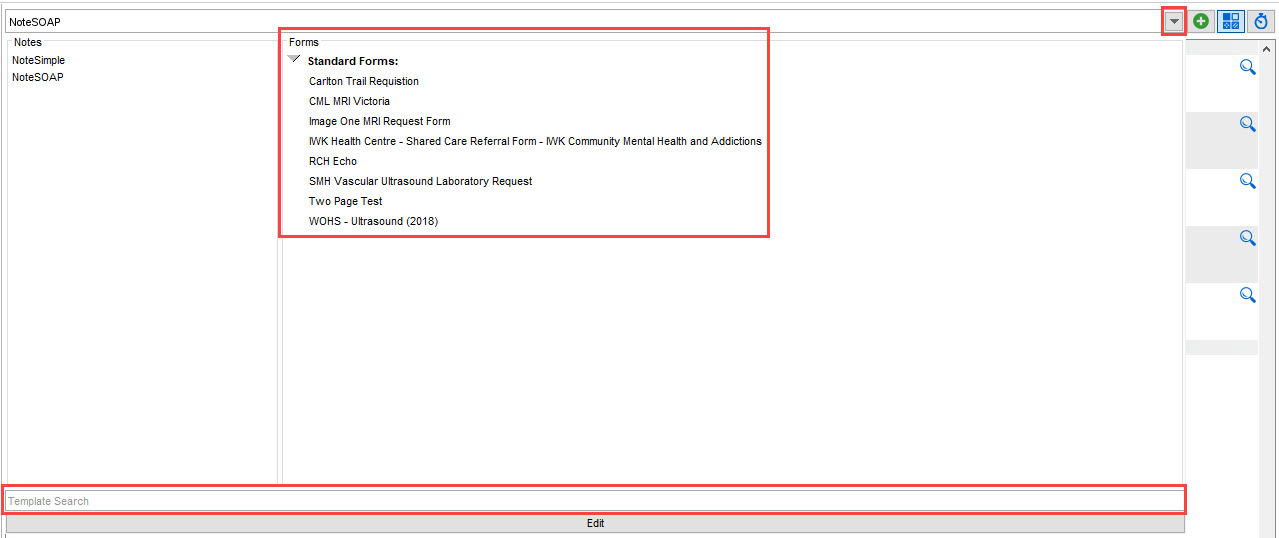
Forms
Add a Form in Encounter Notes
- Click the EMR button on the Accuro Navigation bar and click the Encounter Notes tab.
- In the section in the middle of the screen, dropdown list and select the Forms template you want to use from the list displayed. You can use the Search field to narrow the displayed information.
Note: See (link to Form Editor for more information on forms.
- The template you selected opens, complete the form as required. Type in a Title, Description, DOS, and Provider, if desired.
- To print the form, click Print.
To fax the letter, click Fax, add a Recipient by clicking the Add button, searching the recipient and clicking Select. Add a Coversheet Message, if required, and click Send.
- Click OK to close the window and add the Form to the Encounter Notes and Virtual Chart.
AutoRecovery for Forms
If you are hosted on Accuro Cloud or ASP, your in-progress Forms will be backed up every 10 seconds. In the event of an unexpected Accuro closure, users will find any open Forms with content saved up to 10 seconds before the closure when they log back in.
In the top left corner of a Form, users will see  which will notify the user that AutoRecovery is enabled.
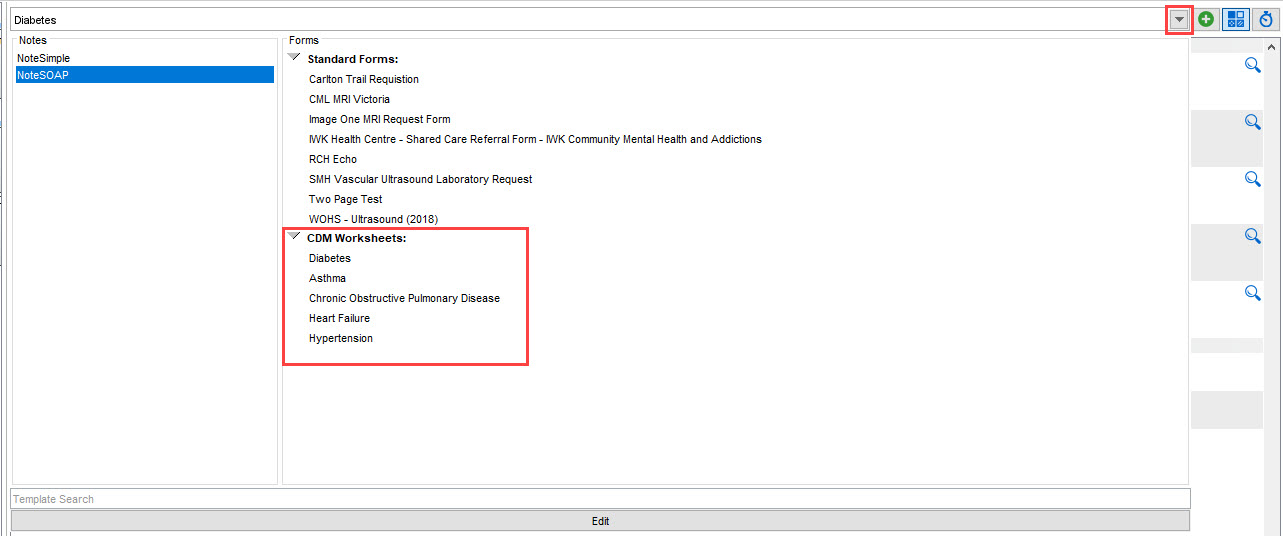
Add a CDM Worksheet in Encounter Notes
Note: This is only applicable to clinics with the Chronic Conditions module enabled.
For more information, see CDM Worksheets. The CDM Worksheets availability varies from province to province such as:
- Diabetes
- Asthma
- Chronic Obstructive Pulmonary Disease
- Heart Failure
- Hypertension
- Click the EMR button on the Accuro Navigation bar and click the Encounter Notes tab.
- Click the dropdown list in the Clinical Notes section. The CDM Worksheets are located at the bottom of the Forms list.
- The selected form will open.
- Fill in the desired fields.
There is a button on CDM Worksheets called Select Recent Values that will load the most recent values into the worksheet. When Select Recent Values is clicked, the appropriate rows are colored pink. The coloring of the rows is only applicable to SK, ON, and any custom made forms This is not applicable to MB forms.
The Next Due date is calculated by using the lab observation date rather than the worksheet encounter date.
Click the Add button to add any new values for that field. Note: Any new lab results will be updated in the Labs panel of the Encounter Notes.
- Once complete, click Save and Close.
Edit a Form / CDM Worksheet in Encounter Notes
- Click the EMR button on the Accuro Navigation bar and click the Encounter Notes tab.
- Double-click the desired existing form / CDM Worksheet for the patient and make the desired edits.
- Click OK to save it to the Encounter Notes and Virtual Chart tabs.
Remove a Form / CDM Worksheet in Encounter Notes
- Click the EMR button on the Accuro Navigation bar and click the Encounter Notes tab.
- Right-click the desired existing form / CDM Worksheet for the patient, click Delete and in the confirmation window, click Yes.
Note: Once a form / CDM worksheet is reviewed, it is unable to be deleted.
Review a Form / CDM Worksheet in Encounter Notes
- Click the EMR button on the Accuro Navigation bar and click the Encounter Notes tab.
- Double-click the desired existing form / CDM Worksheet for the patient and click the Reviewed or Review and Close button.
- Click OK or Close. A Reviewed icon will display next to the form.
Note: Once a form / CDM worksheet is reviewed, it is unable to be deleted.
Create a New Copy of a Form in Encounter Notes
- Click the EMR button on the Accuro Navigation bar and click the Encounter Notes tab.
- Right-click the existing form for the patient desired to be copied and click Create New Copy.
- To create a new copy of the form without the original form's filled in content, select Blank Form.
To create a new copy of the form with the original form's filled in content, select Autofill from Original Form.
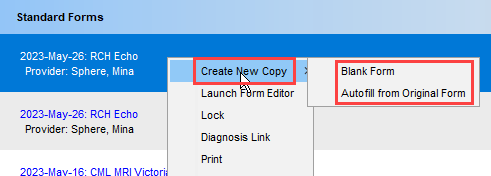
- Make the desired edits and click OK to save the form to the patient's Encounter Notes / Virtual Chart.
To print or fax the form, see Print a Form / CDM Worksheet in Encounter Notes or Fax a Form / CDM Worksheet in Encounter Notes.
Note: If the form that is being copied has a template that is Under Construction in the Form Editor or has been deleted, the Create New Copy option will not be available. One of the below warnings will display next to the existing form desired to be copied for the patient:


To enable the Create New Copy option, the form template must be updated to no longer be Under Construction or a new form template created.
Launch Form Editor from Encounter Notes
The Launch Form Editor option will only be visible from the Encounter Notes tab to users who have Feature Access to the Form Editor. For more information on these permissions, see Feature Access.
- Click the EMR button on the Accuro Navigation bar and click the Encounter Notes tab.
- Right-click the desired existing form for the patient and click Launch Form Editor.

- The Form Editor will launch and if the form has an active template, even if under construction, it will load in the Form Editor.
Note: If the template has been deleted, while the Launch Form Editor option will be available, there will be no template loaded in the Form Editor.
Lock a Form
- Click the EMR button on the Accuro Navigation bar and click the Encounter Notes tab.
- Right-click the existing encounter note or form for the patient and select Lock from the list displayed.
- Click Yes in the Lock Chart Item prompt to lock the encounter note / form.
- The lock beside the encounter note / form indicates the item is locked.
Note: Only users with the Feature Access "Lock & Review Clinical Notes" enabled have the ability to lock an encounter note / form.
Unlock a Form
- Click the EMR button on the Accuro Navigation bar and click the Encounter Notes tab.
- Right-click the existing encounter note or form for the patient and select Unlock from the list displayed.
Note: Only users with the Feature Access "Lock & Review Clinical Notes" enabled have the ability to unlock an encounter note / form.
Mask Form
- Hold down the Alt key and click to select the existing encounter note or form being masked for the patient. The Configure Mask window is displayed.
- Click the Masked checkbox. The date, time and person masking the note are automatically completed by Accuro.
- Type in a Note, if required.
- Click the Add button to authorize other users to view the masked encounter note / form.
- Select the user to be authorized.
- If there is a date that the encounter note / form can be viewed until before it is masked for this user select the User and click the Add button.
- Click the Only Allow Until checkbox, add the date, and select the appropriate users. Click OK to save any changes.
- The encounter note / form is masked.
- Repeat this procedure from step 5 to allow other users to access this masked encounter note / form. When all users have been added click OK to save the details and mask the encounter note / form.
A blue triangle in the corner of the encounter note indicates it is masked. You can only see the encounter note details if you have been granted access.
Note: Only users with the Feature Access "Create & Modify Masks" enabled have the ability to mask an encounter note / form.
Unmask a Form
- Hold down the Alt key and click to select the masked encounter note or form for the patient. The Configure Mask window is displayed.
- Click to deselect the Masked checkbox.
- Click OK. The Remove Mask window is displayed if the Provider unmasking the encounter note / form is not the original Provider who applied the mask.
- Type in your Accuro Password.
- Click the dropdown list to the right of Reason and select the reason for unmasking the encounter note / form.
- Click OK. The encounter note / form is unmasked.
Note: Only users with the Feature Access "Create & Modify Masks" enabled have the ability to unmask an encounter note / form.
Link Diagnosis to a Form / CDM Worksheet in Encounter Notes
A Diagnosis can be link to a form in two ways:
- Click the EMR button on the Accuro Navigation bar and click the Encounter Notes tab.
- Right-click the desired existing form / CDM Worksheet for the patient and click Diagnosis Link. The History of Problems window will display.
- Select the desired problem to link to the form / CDM Worksheet.
- Click Save and Link.
The second way of linking a diagnosis with a form is with the following workflow:
- Click the EMR button on the Accuro Navigation bar and click the Encounter Notes tab.
- Double-click the desired form. The form will display.
- Click the Link button
 in the top bar. The History of Problems window will display.
 - Select the desired problem to link to the form.
- Click Save and Link.
- Click OK or Close.
Print a Form / CDM Worksheet in Encounter Notes
A form can be printed from the Encounter Notes in two ways:
- Click the EMR button on the Accuro Navigation bar and click the Encounter Notes tab.
- Right-click the desired existing form / CDM Worksheet for the patient and click Print.
- Select the desired printer and OK.
The second way of printing a form is with the following workflow:
- Click the EMR button on the Accuro Navigation bar and click the Encounter Notes tab.
- Double-click the desired existing form for the patient. The form will display.
- Click Print.
- Select the desired printer and OK.
Fax a Form / CDM Worksheet in Encounter Notes
A form can be faxed from the Encounter Notes in two ways:
- Click the EMR button on the Accuro Navigation bar and click the Encounter Notes tab.
- Right-click the desired existing form / CDM Worksheet for the patient and click Fax.
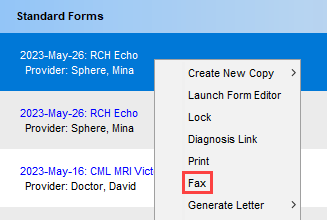
- Add a Recipient by clicking the Add button , searching the recipient and clicking Select.
- Add a Coversheet Message, if required, and click Send.
The second way of faxing a form is with the following workflow:
- Click the EMR button on the Accuro Navigation bar and click the Encounter Notes tab.
- Double-click the desired existing form for the patient. The form will display.
- Click Fax.
- Add a Recipient by clicking the Add button , searching the recipient and clicking Select.
- Add a Coversheet Message, if required, and click Send.
Send Message Including a Form in Encounter Notes
- Click the EMR button on the Accuro Navigation bar and click the Encounter Notes tab.
- Right-click the desired existing form for the patient and click Send Message.
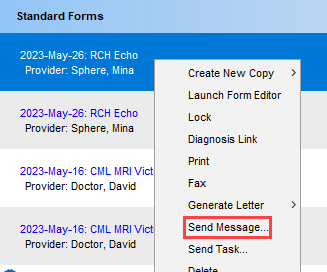
- The New Review Message window will display with the form as an attachment.
- Select/enter the Recipient, Subject, Body, and/or Priority as desired.
- Click Send.
Send Task Including a Form in Encounter Notes
- Click the EMR button on the Accuro Navigation bar and click the Encounter Notes tab.
- Right-click the desired existing form for the patient and click Send Task.
- The New Task window will display with the form as an attachment.
- Select/enter the Recipient, Task, Priority, Due Date, and/or Priority as desired.
- Click OK.
Send a Form / CDM Worksheet to Patient
Note: This is only applicable to clinics with the Medeo Messaging and HealthMail modules enabled.
- Click the EMR button on the Accuro Navigation bar and click the Encounter Notes tab.
- Right-click the desired existing form for the patient and click Send to Patient.
Compare Two Documents in Encounter Notes
Configure Compare in Encounter Notes
- Click the EMR button on the Accuro Navigation bar and click the Encounter Notes tab.
- Click the Document Comparison button
 at the top of the Medical History Band section.
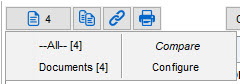
- Select Configure. The Document Comparison window is displayed.
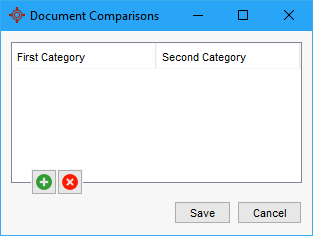
- Click the Add button .
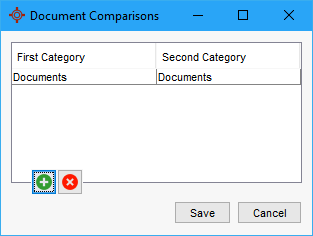
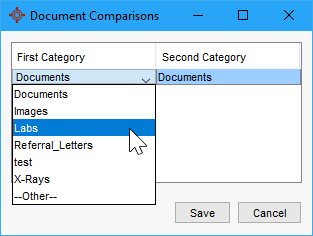
- Click Documents in the First Category and select from the list displayed.
- Click Documents in the Second Category and select from the list displayed.
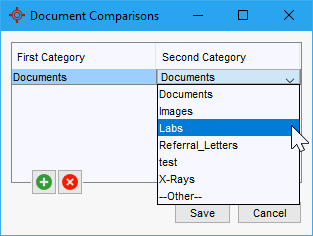
Note: The option of "Other" in the document comparison is to allow for adding documents that are not in the default document types configured for a site.
Compare Two Documents in Encounter Notes
- Click the EMR button on the Accuro Navigation bar and click the Encounter Notes tab.
- Click the Document Comparison button at the top of the Medical History Band section.
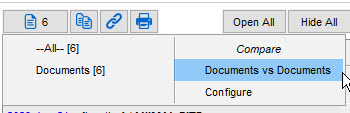
- Select the desired comparison configuration under Compare.
- The Document Compare window opens. To move through the documents, click the arrows at the bottom of the window.
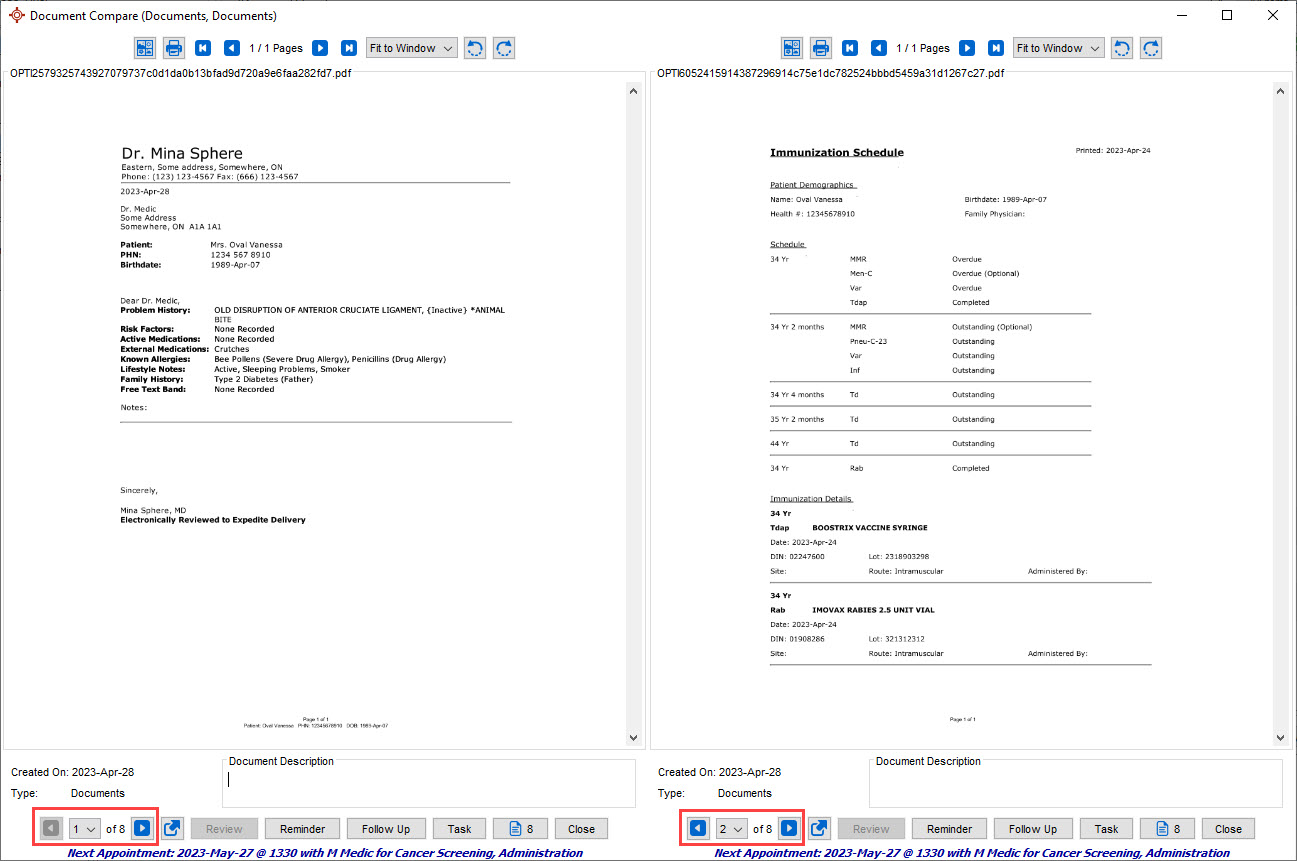
If desired, a Description can be added to the document. This will save to the document when the window is closed. - When the comparison is complete, click Close.