Labs in Encounter Notes
The area at the bottom of the screen in the Encounter Notes tab contains the patient's lab results.

Graph button  - Users can view a graph of selected results. See (link) for more information.
Add button  - Users can add a lab to the patient. See (link for Add Lab) for more information.
Edit button  - Users can edit observations on manual lab tests.
Filter dropdown- Users can choose options of how to sort the labs that displays. See (link for Create Lab Summary) for more information.

Add a Manual Lab in Encounter Notes
To access Lab Tests, click here. To access Lab Results, click here. These items were accessed from within Encounter Notes and have been moved to the Configuration menu at the top of the Accuro window.
- Click the EMR button
 on the Accuro Navigation bar and click the Encounter Notes tab.
 - Click the Add button . The Lab Tests window is displayed.
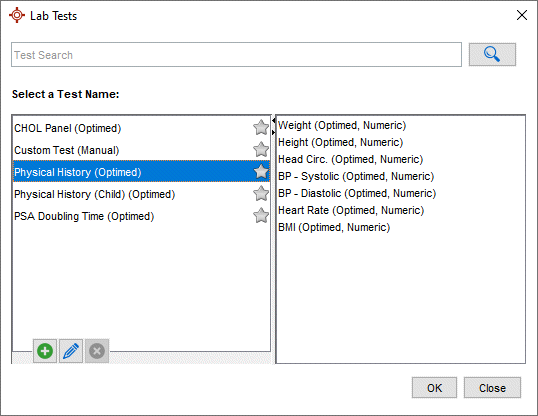
- Select the appropriate Lab Result from the list displayed. You can also type in the name of the lab result and click the Search button
.
- Click the OK button. The Lab Results Entry window is displayed.

Type in the lab information in the fields at the top of the window. - Type in the results in the fields displayed.
- If a field you want is not displayed, click the Add button to add the test result. The Lab Result Search Window is displayed.
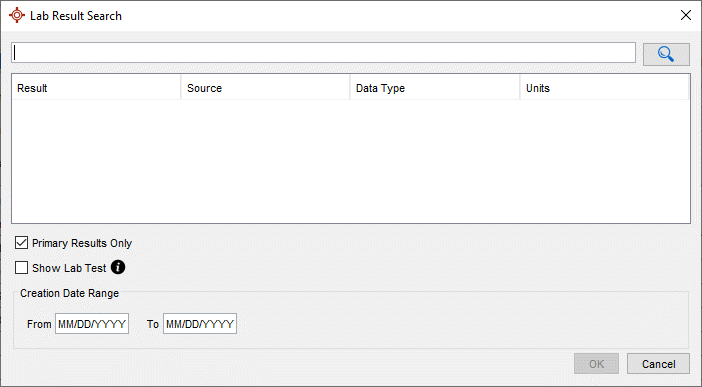
- Type in the name of the test and click the Search button
 .
.
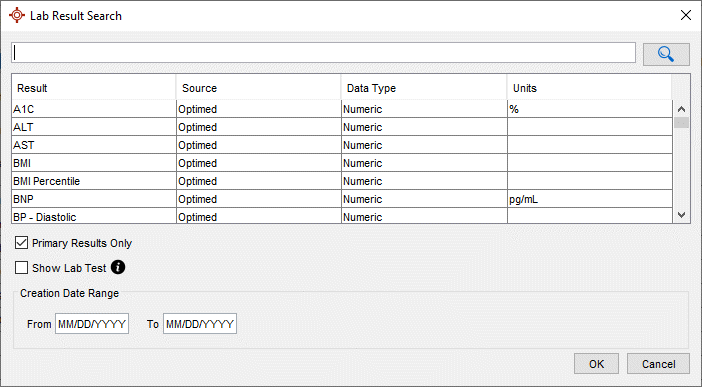
- Click to select the required test and click OK. This test is now included in the table. Type in the results.
- Select the Provider.
- Apply and Save to save your results and close the window.
Note: If multiple tests are being saved, the Save button ![]() will display as a Save All button
will display as a Save All button ![]() .
.
Edit a Manual Lab in Encounter Notes
To access Lab Tests, click here. To access Lab Results, click here. These items were accessed from within Encounter Notes and have been moved to the Configuration menu at the top of the Accuro window.
- Click the EMR button on the Accuro Navigation bar and click the Encounter Notes tab.
- Click the Edit button . The select Test window is displayed.
- Click the dropdown list
 and select the appropriate Manual Lab Test from the list displayed. The Lab Results Entry window is displayed.
- Update the lab information in the fields at the top of the window, if required.
- Type in to change the results in the fields that need editing.
- If a field you want is not displayed, click the Add button to add the test result. The Lab Result Search Window is displayed.
- Type in the name of the test and click the Search button .
- Click to select the required test and click OK. This test is now included in the table. Type in the results.
- Select the Provider, if this needs changing.
- Apply and Save to save your changes and close the window.
Note: If multiple tests are being saved, the Save button ![]() will display as a Save All button
will display as a Save All button ![]() .
.
Remove a Manual Lab in Encounter Notes
To access Lab Tests, click here. To access Lab Results, click here. These items were accessed from within Encounter Notes and have been moved to the Configuration menu at the top of the Accuro window.
- Click the EMR button on the Accuro Navigation bar and click the Encounter Notes tab.
- Click the Edit button . The select Test window is displayed.
- Click the dropdown list and select the appropriate Manual Lab Test from the list displayed. The Lab Results Entry window is displayed.

- To remove individual results from the entry, click the desired result from the middle table and then click the Remove button
 . Click Apply and Save to save your changes and close the window.
 - To remove the lab results entry in its entirety, click the Remove button in the bottom of the screen and click Yes on the confirmation window.
Filter Lab Results in Encounter Notes
- Click the EMR button on the Accuro Navigation bar and click the Encounter Notes tab.
- Click the dropdown list and select the Filter from the list displayed. You can filter by Results, by Tests and by Date. The Lab Results are now displayed in the order you selected.
To add additional filter options, see Create a New Lab Summary Configuration from Encounter Notes.
Create a New Lab Summary Configuration from Encounter Notes
If your clinic receives a large number of lab results and these are difficult to manage, you can create your own customized groups to decide which results you want grouped together. The customized groups can be set up for either a Provider or for the entire office.
To create a Lab Summary from the Home Section, see Customizing Lab Grouping.
- Click the EMR button on the Accuro Navigation bar and click the Encounter Notes tab.
- Click the dropdown list in the labs section (bottom of the window in the middle) and select Manage from the list displayed. The Edit Lab Summary Configurations window is displayed.
- Click the Add button . The Edit Lab Summary Configurations window is displayed.
- In the Name field type in the name of the group being created.
- In Displayed Results, click the Add button . The Lab Search Results window is displayed.
- Type in the results to be added to the group and click the OK button to add them to the list.
Note: If only the primary results are to be displayed then select the Primary Results Only checkbox. - Repeat this step 5 and 6 until you have added all the required results to the list.
- Select a result and use the Up
 and Down
  arrow buttons to change the order the results are displayed.
 - To display only the most recent results select the Display Most Recent checkbox.
- Select the Include Lab Date, if you want the lab dates included in the filter view.
- Select the number of Items for each result type.
- Click and select the Lab Summary Type. The options are Personal (only the current user can see this filter) or Office (everyone in the office can see the filter view).
- Click OK to save.
- Click Close.
Edit a Lab Summary Configuration from Encounter Notes
- Click the EMR button on the Accuro Navigation bar and click the Encounter Notes tab.
- Click the dropdown list in the labs section (bottom of the window in the middle) and select Manage from the list displayed. The Edit Lab Summary Configurations window is displayed.
- Click the desired Summary and click Edit button . The Edit Lab Summary Configurations window is displayed.
- Make the desired changes.
To remove results: In Displayed Results, select the desired result and click the Remove button.
To add results: In Displayed Results, click the Add button. The Lab Search Results window is displayed. Type in the results to be added to the group and click the OK button to add them to the list.
Note: If only the primary results are to be displayed then select the Primary Results Only checkbox. - Click OK to save.
- Click Close.
Remove a Lab Summary Configuration from Encounter Notes
- Click the EMR button on the Accuro Navigation bar and click the Encounter Notes tab.
- Click the dropdown list in the labs section (bottom of the window in the middle) and select Manage from the list displayed. The Edit Lab Summary Configurations window is displayed.
- Click the desired Summary and click the Remove button , and click Yes on the confirmation window.
- Click Close.
View Lab Results Graphing from Encounter Notes
To view a graph of Lab Results from the Home Section, see View Lab Results Graphing for more information.
- Click the EMR button on the Accuro Navigation bar and click the Encounter Notes tab.
- Click the Graph Button in the Labs section. The Labs Results Graphing window is displayed.
- Click the dropdown list and select the Diagnosis Filter from the list displayed.
- Click the dropdown list and select the Lab Tests from the list displayed.
- Select from the Show Ref Range, Show Meds, Show Appts and Show Points checkboxes, as applicable.
- Click the Page Format button
 and change any of your page settings, as required.
 - Click the Print button
 .
. - Select the appropriate printer and click OK.
View a Lab Summary in Encounter Notes
- Click the EMR button and click the Encounter Notes tab.
- Right-click a result in the Labs section at the bottom of the window and select View Lab Summary from the list displayed.
Clinical Growth Charts in Encounter Notes
To display the patient's data on this growth chart the data must first have been entered into the patient's EMR. See (link to how to add manual lab).
- Click the EMR button and click the Encounter Notes tab.
- Right-click in the Labs section at the bottom of the window and select Clinical Growth Charts from the list displayed.
Note: The Filter dropdown must be set to By Tests or By Date. - Select the appropriate printer and click OK.
Print a Lab Summary in Encounter Notes
- Click the EMR button and click the Encounter Notes tab.
- Right-click in the Labs section at the bottom of the window and select Print from the list displayed. The Print window is displayed.
- Select the appropriate printer and click OK.
Direct Lab Linking in Encounter Notes
- Click the EMR button on the Accuro Navigation bar and click the Encounter Notes tab.
- Select the lab results to be linked in the Labs section at the bottom of the window.
- Right-click and select Link Results. The Lab Result Linking window is displayed.
Note: The Filter dropdown must be set to By Results.
- Add or remove results, as required.
- Click to select the Primary Result for the result group and then click the Set Primary Result button.
- Click OK to save your changes.
Send a Lab Result to Patient
Note: This is only applicable to clinics with the Medeo Messaging and HealthMail modules enabled.
- Click the EMR button on the Accuro Navigation bar and click the Encounter Notes tab.
- Right-click the desired lab result, click Send to Patient.
Note: The Filter dropdown must be set to By Tests or By Date.
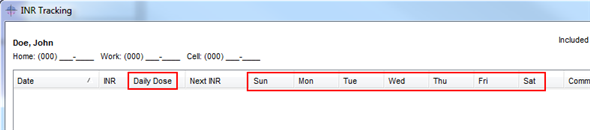
INR Tracking in Encounter Notes
INR Tracking is only displayed in the Encounter Notes if your clinic has the INR Lab Tracking module enabled by QHR Technologies. If you'd like this module enabled, please contact our Accuro Client Services.
- Click the EMR button on the Accuro Navigation bar and select the Encounter Notes tab.
- Click the INR Tracking button
 in the Labs section. The INR Tracking window is displayed.
 - Click the dropdown list and select the Included Results from the list displayed.
- Click the dropdown list and select the Filter from the list displayed.
- Click OK to close the window.
Note: INR Tracking can be sorted by date order and reverse chronologically by clicking the arrow in the date heading.
Manage Included Results in INR Tracking
- Click the EMR button on the Accuro Navigation bar and select the Encounter Notes tab.
- Click the INR Tracking button in the Labs section. The INR Tracking window is displayed.
- Click the dropdown list next to Included Results and select Manage.
- To add results: Click the Add button , search and select the desired result and click OK.
To remove results: Select the desired result and click the Remove button.
- Click OK to close the window.
Text Entry in INR Tracking
When tracking INR dose changes a user can enter non-numeric characters (e.g. 100 mg or 1 Tab) into the Daily Dose and Weekly Day dosage fields.
Print INR Tracking
- Click the EMR button on the Accuro Navigation bar and select the Encounter Notes tab.
- Click the INR Tracking button in the Labs section. The INR Tracking window is displayed.
- Click the dropdown list and select the Included Results from the list displayed.
- Click the dropdown list and select the Filter from the list displayed.
- Click the Print button.
- Click the dropdown list to select the appropriate printer and click OK.
Lab Configuration in Encounter Notes
Edit the Order of Lab Test Results from Encounter Notes
- Click the EMR button on the Accuro Navigation bar and click the Encounter Notes tab.
- Click the Add button . The Lab Tests window is displayed.
- To search for a test, type in the test name and click the Search button .
- Select the appropriate test in the left-hand side of the window and Click the Edit button . The Edit Lab Test window is displayed.
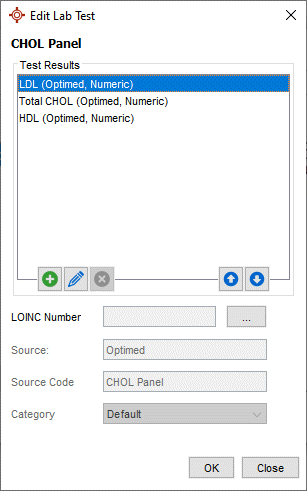
- To change the order of any of the test results, click to highlight the result and use the arrows
 to move the result up or down the list of results.
 - Click OK to save and leave the Edit Lab Test window.
- In the main Lab Test window, click Close.
Favorite Custom Lab Tests from Encounter Notes
- Click the EMR button on the Accuro Navigation bar and click the Encounter Notes tab.
- Click the Add button . The Lab Tests window is displayed.
- All the tests listed in the left-hand side of the window can be marked as Favorite. To do this, click the star to the right of the test. Any tests that are favorites are colored gold.

- Click Close to exit the window.
Change Lab Summary Text Length
Lab summary text of longer than a specified length can filtered out of the lab summary view. If the checkbox that sets this option is selected then the default length is 10 characters. Up to 99 characters in length may be specified.
- Press and release Alt on the keyboard or click the Accuro Start Menu button
 .
. - Navigate to Users and select Manage Security.
- Click System Settings and then the General tab.
- Under the Encounter Notes header, click the Filter Text Labs Longer Than in Encounter Notes checkbox.
- Select the number of characters.
- Click Save Settings and then Close.