Labs (Results)
Labs is the inbox for all the electronic lab results received in your clinic. Each Provider has their own labs folder. There is also an Unassigned folder, this contains labs that Accuro was unable to assign to a specific Provider. It is important to check the Unassigned folder regularly and make sure that any labs it contains are assigned to the appropriate Provider so they may be reviewed and filed on a patient's EMR.
In the Provider folder, view the lab results, the date received, whether Accuro was able to match the lab with a patient, the type of test, whether the labs had abnormal results, whether it has been reviewed, and if a patient needs to be contacted.
Within each Provider's folder there may be one folder or there could be several. This depends upon where the labs come from and also the format in which they are sent.
The first format, HL7 (e.g. haematology), ends up in the Provider's main folder. These are the kind of labs that provide results for the lab summary pane in Encounter Notes.
The second format is either images or large blocks of text (e.g. biopsies). These often end up in the lab documents folder along with faxed labs.
There may be other examples not mentioned above.
Labs that have been received but have not yet been viewed appear bold in the Inbox and have "NEW" in the Reviewed column of the Virtual Chart until the lab is read.
When using the locate patient option in the labs inbox, a check is made to see if the selected labs contain patients with different names and health numbers (because some labs send back results for more than one patient in a single file). If more than one name or health number is found then a warning message is displayed to notify the user.
Filter Labs
- Click the Home button
 on the Accuro Navigation bar and select the Labs folder.
- Click on the appropriate Provider's folder.
- Click to select the appropriate labs folder.
- Click the Date Filter and choose to see "All Results" or "Results from the last year". By default the date filter is set to "All Results".
- Click the checkbox beside Unreviewed to see labs that have not been reviewed by the Provider.

Note: To include Patient Follow-ups, select the appropriate checkbox.
Assign a Lab to a Provider
- Click the Home button on the Accuro Navigation bar and select the Labs folder.
- Click the appropriate lab.
- Click the Assign Provider button.
- Select a Provider from the dropdown list.
- Choose whether to Forward or Assign the lab to the Provider and click OK.
View Lab History
- Click the Home button on the Accuro Navigation bar and select the Labs folder.
- Click to select the appropriate Provider and lab folders.
- Click the appropriate lab.
- Click the Review History button.
- Select a Review Date from the popup calendar.
- Select a Provider from the dropdown list.
- Click Close to save changes and exit the review history.
Match a Patient to a Lab
Some labs when received are marked Unmatched. This means Accuro doesn't know which patient the lab is intended for. In this case the lab needs to be matched to the appropriate patient.
- Click the Home button on the Accuro Navigation bar and select the Labs folder.
- Click to select the appropriate Provider and lab folders.
- Click on a lab to select it.
- Click Locate Patient. This opens a Transfer Lab window.
- Use the Patient Search to search for the patient. Searches can also be made on name or health number.
Note: If the patient is not found in Accuro, add the patient by clicking the New Patient button.
- Select the desired patient and click OK to link the lab to the patient's chart.
Notes: If any of the patient's demographics differ on the lab from the selected Accuro patient, an Update Demographics window will display and a selection can be made using the radio buttons for which details to use on the Accuro patient.
Print a Lab
- Click the Home button on the Accuro Navigation bar and select the Labs folder.
- Click to select the appropriate Provider and lab folders.
- Click the appropriate lab and click the Print button. Alternatively right click on the appropriate lab and select Print from the list displayed.
- Select the appropriate printer and click OK.
Review a Lab
- Click the Home button on the Accuro Navigation bar and select the Labs folder.
- Click to select the appropriate Provider and lab folders.
- Click the appropriate lab.
- Click the Review button.
Unreview a Lab
Where a lab has been reviewed in error, it is possible to unreview the lab.
- Click the Home button on the Accuro Navigation bar and select the Labs folder.
- Click to select the appropriate Provider and lab folders.
- Click the appropriate lab.
- Click the Review History button.
- Select a Review Date from the popup calendar.
- Select a Provider from the dropdown list.
- Click the checkbox beside the appropriate lab(s) and click Unreview Selected.
- Click Close to save changes and exit the review history.
Create a Follow Up Request for a Lab
- Click the Home button on the Accuro Navigation bar and select the Labs folder.
- Click to select the appropriate Provider and lab folders.
- Click on a lab to select it.
- Click the Follow Up Request button.
- Select the user(s) to send the request to under the To heading.
- Select a Priority from the dropdown list.
- Type a message in the body text-area.
- Click Send.
View Lab Results Summary
- Click the Home button on the Navigation bar and select the Labs folder.
- Click to select the appropriate Provider and lab folders.
- Double-click on a lab to select it.
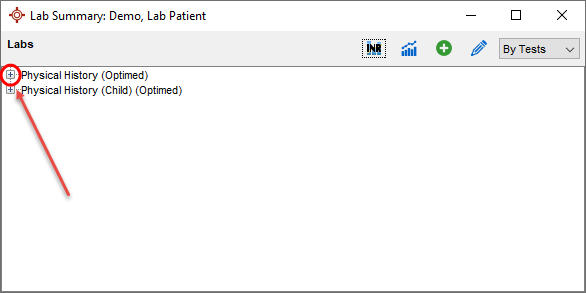
- Click the Lab Results Summary button
 at the bottom right-hand side of the window. Use the
  in the main window area to expand the results.
Note: The most recent results are displayed in bold.
View Clinical Growth Chart
- Right click the Lab and select Clinical Growth Chart.
- Select the appropriate chart from the menu.

View Lab Results Graphing
Lab results Graphing can be viewed from either Labs in the Home section or from Encounter Notes in the EMR section of Accuro. Follow either of the procedures below:
Creating a Lab Group from Within the Home Section of Accuro:
- Click the Home button on the Navigation bar and select the Labs folder.
- Click to select the appropriate Provider and lab folders.
- Double-click on a lab to select it.
- Click the Lab Results Summary button at the bottom right-hand side of the window. Use the in the main window area to expand the results.
Note: The most recent results are displayed in bold.
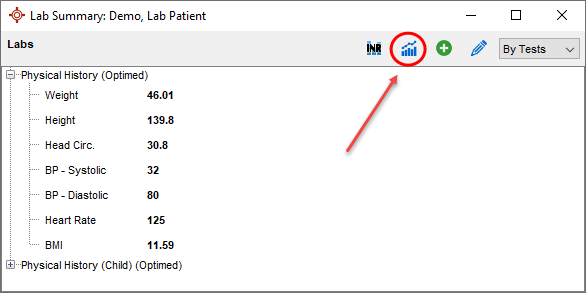
- To display in a graphical format, click
 as shown on the image below:
- Using the dropdown list you can filter by diagnosis or lab tests. To view a specific item e.g. weight, click to select from the list displayed.
- Use the checkboxes to select Show Ref Range, Show Meds, Show Appts and Show Points, as required.
- Click the Close button
 when completed.
Creating a Lab Group from Within the EMR Section of Accuro:
- Click the EMR button
 on the Navigation bar and click the Encounter Notes tab.
- Use the in the main labs window area to expand the results.
Note: The most recent results are displayed in bold.

- To display in a graphical format, click as shown on the image below:

- Using the dropdown list you can filter by diagnosis or lab tests. To view a specific item e.g. weight, click to select from the list displayed.
- Use the checkboxes to select Show Ref Range, Show Meds, Show Appts and Show Points, as required.
- Click the Close button when completed.
Create a Manual Lab Result Form
- Click the Home button on the Navigation bar and select the Labs folder.
- Right-click in the section of the window where the labs are listed (see below) and select New Lab.

- Select the appropriate patient from the list displayed. If the correct patient is not displayed, type in their name and then select from the list displayed
Note: If the manual lab form being creating is not specific to any patient i.e. it is being creating for use at some point in the future, select any patient in order to continue.
- Click the Edit Tests button to bring up the Edit Lab Tests window.
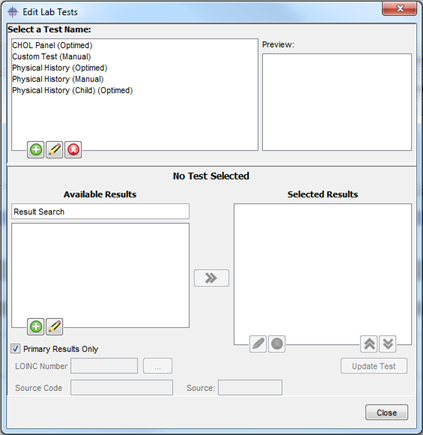
- Click the Add button
 to bring up the Input window, type in the name of the new test and click OK.
- Click the Add button "" in the Available Results box (toward the bottom of the window) to bring up the Input window.
- Type in the name of the new result and click OK.
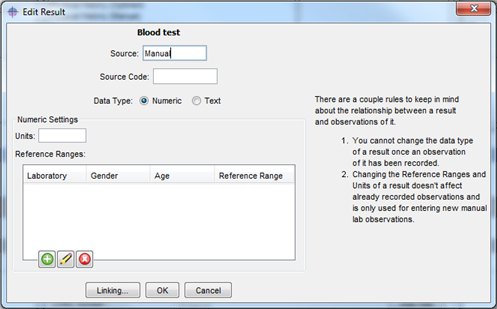
- Edit the reference range and the units of measurement in the Edit Result window and click OK to save.
Note: Repeat this step as necessary, until you have all the required results fields.
- Select the results from the Available Results list and click the Arrow button to move them to the Selected Results list.
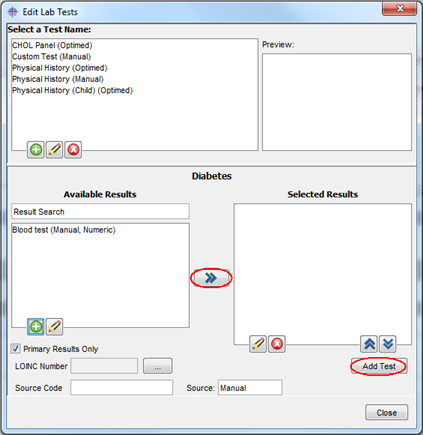
- Use the Arrow buttons
 to move the results up and down to display in a convenient order.
- Click Add Test
- When completed, click Close.
Edit a Manual Lab Result Form
- Click the Home button on the Navigation bar and select the Labs folder.
- Right-click in the section of the window where the labs are listed (see below) and select New Lab.
- Select the appropriate patient from the list displayed. If the correct patient is not displayed, type in their name and then select from the list displayed
- Click the Edit Tests button to bring up the Edit Lab Tests window.
- Click to select the lab test form to be edited and click the Edit button
 .
.
- Type in the name of the new results and click OK.
- Edit the reference range and the units of measurement in the Edit Result window and click OK to save.
Note: Repeat this step as necessary, until you have all the required results fields.
- Select the results you want from the Available Results list and click the chevron to move them to the Selected Results list.
- Use the Arrow buttons to move the results up and down to display in a convenient order.
- To delete results that are no longer required, click to select the result and then click the Delete button
 .
.
- Click Update Test and Close.
Delete a Manual Lab Result Form
- Click the Home button on the Navigation bar and select the Labs folder.
- Right-click in the section of the window where the labs are listed (see below) and select New Lab.
- Select the appropriate patient from the list displayed. If the correct patient is not displayed, type in their name and then select from the list displayed
- Click the Edit Tests button to bring up the Edit Lab Tests window.
- Click to select the lab test form to be deleted and click the Delete button pat.
- A delete confirmation message is displayed, click Yes followed by OK.
Note: Any test names that have (Optimed) after them are standard in the Accuro software and cannot be deleted.
- Click Close.
Add a Manual Lab Result
- Click the Home button on the Navigation bar and select the Labs folder.
- Right-click in the section of the window where the labs are listed (see below) and select New Lab.
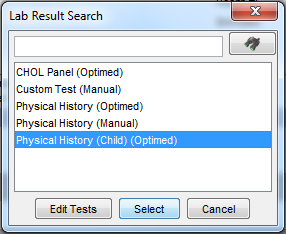
- Select the appropriate patient from the list displayed. If the correct patient is not displayed, type in their name and then select from the list displayed.
- In the Lab Result Search window select the appropriate test and click Select.
- Click the Add button to enter the lab results into the value column. Use the scroll bar to move down the list of results.
- Click Apply and OK to save the lab results.