Medications
Medications is the area of Accuro that contains a patient's medication record and allergy information. Prescriptions are also printed out and renewed from this area of Accuro.
- Medical and non-medical allergies can be recorded at the bottom of the window along with reactions that occur when the allergy is encountered.
- Prescriptions have whole numbers displayed as integers (e.g. 5 rather than 5.0). This is a safety feature and eliminates any possibility of misreading a decimal place.
- When a prescription is printed, the "Created On" date is added to the prescription. The date the prescription was created on is located just above the "Printed By" details.
- The Refill Qty is only included on a prescription if it is different from the quantity field. This field is used if the Provider wants a different quantity dispensed on the refills to that on the original script. To avoid any confusion the quantity per refill has the
- The Pharmacy Contact and To Be Picked Up date fields are located on the Instructions tab as well as the Protocol Identifier checkbox.
- The date the FDB was last updated is displayed; this makes it easy to see how up-to-date your clinic's database is. This can be found in the Medications Search section.
- There is a system setting to exempt acute prescriptions from being expired. They are displayed in red to indicate that they should be expired but they are still shown as active.
- If the status of a prescription is changed, users can hover over the prescription and a tool tip when and why the prescription was changed.
- There is an option to disable low dose warning messages (but to select this option the user needs to be logged in as a Provider).
- Expanding and collapsing prescriptions displays the most recent version of a prescription. Non-active prescriptions are not displayed when the prescriptions are rolled-up.
- Once a script has an item on it compounds cannot be added. A compound has to be the first item on the prescription or a new prescription must be created.
- Drug use defaults to blank with the user having to select either short term or continuous.
- Where items are being managed Accuro finds the mirrors of the items you are managing and applies the management to both items.
- Where interactions occur for a prescription that is being written (for varying dosages of the same medication). The duplicate warning can be dealt with in management.
- Click the icon to bring up management options Apply previous management defaults to on.
Note: Users can manage multiple interactions at the same time using the Ctrl+click or Shift+click, but they must be of the same type.
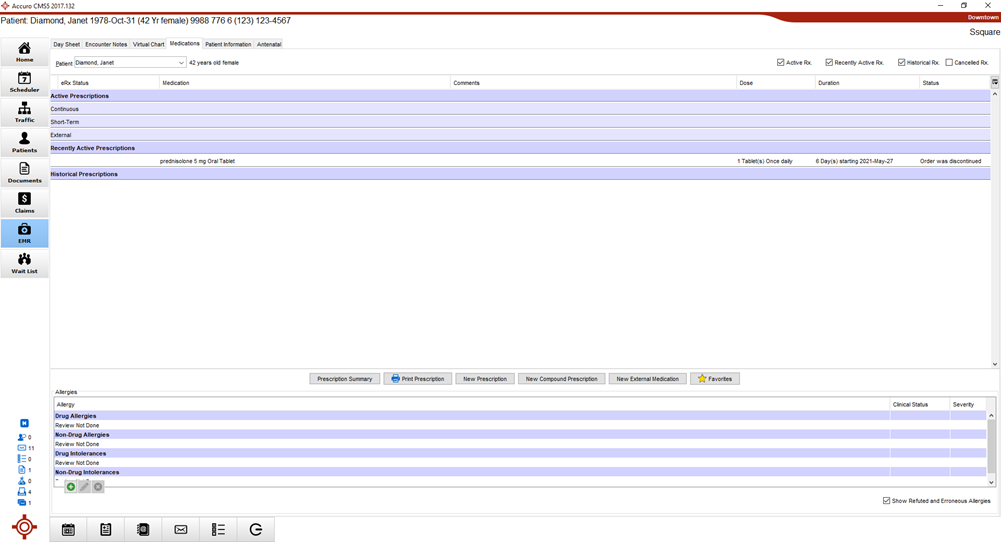
Filter View of the Medications Tab
- Click the EMR button
 on the Accuro Navigation bar.
- Click the Medications tab.
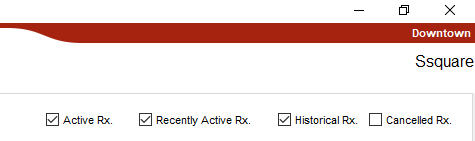
- Use the four checkboxes Active Rx, Recently Active Rx, Historical Rx and Canceled Rx to select what is displayed on this tab.
Icons Used on the Medications Tab
An icon may be displayed next to a medication listed on the Medications tab. The meanings of the icons are listed below:
 Triplicate Drug
Certain drugs are considered high-risk drugs (i.e. prescribed narcotics) and there are legal requirements surrounding the records that have to be kept. Some regions require printing three copies of the prescription, for records rather than just the normal one copy for the pharmacy.
 Rx Interaction
There is a warning or interaction related to this prescription (e.g. the patient had an allergy to the medication). The user has to acknowledge these warnings during the prescription process.
 Rx Dosage
There is a warning relating to the dosage of the prescription that it is outside the recommended range for the medication. The user has to acknowledge these warnings during the prescription process.
 Masked
This medication is masked so that only certain users can see it. Non-authorized users will be able to see that there is a masked prescription, but not what it is.
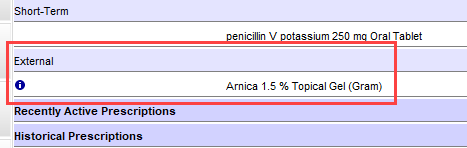
 External Rx
This item was recorded as an external prescription.
 Compound
This item is a compound.
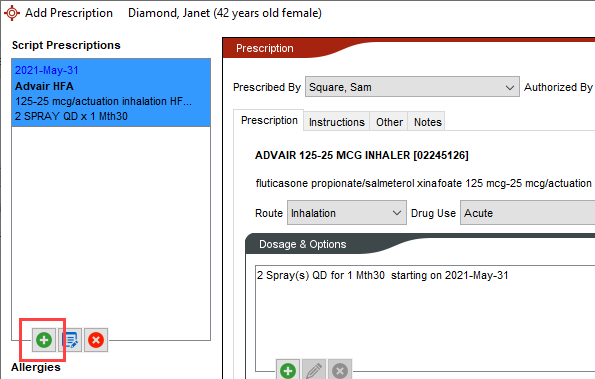
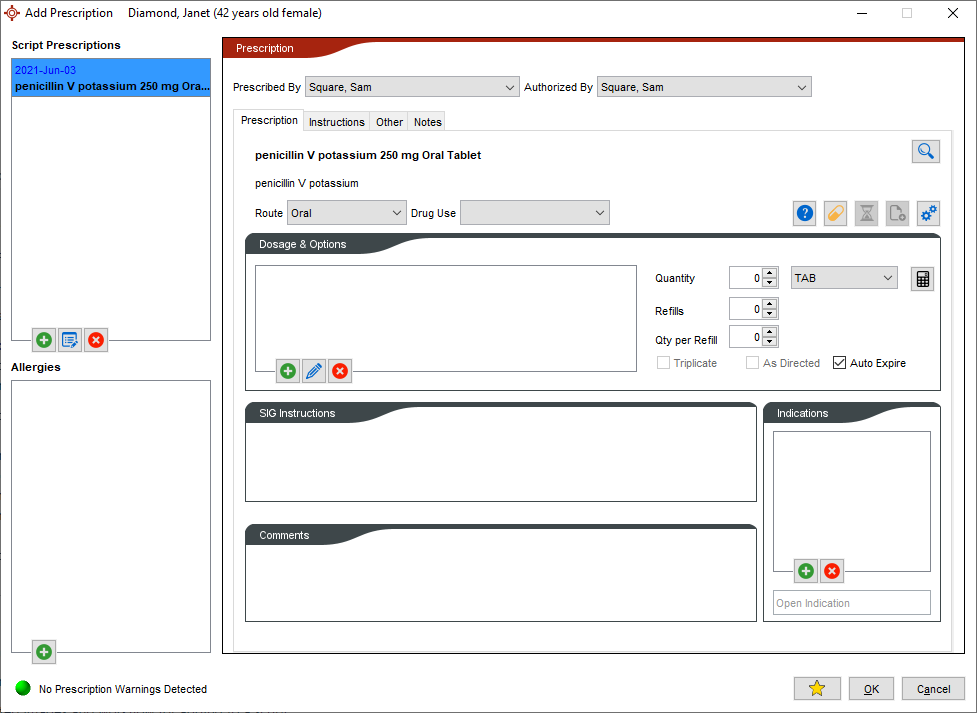
Create a New Prescription
- Select the appropriate patient.
- Click the EMR button on the Accuro Navigation bar.
- Click the Medications tab.
- Click the New Prescription button. The Add Prescription window is displayed with the Medication Search window displayed above it.
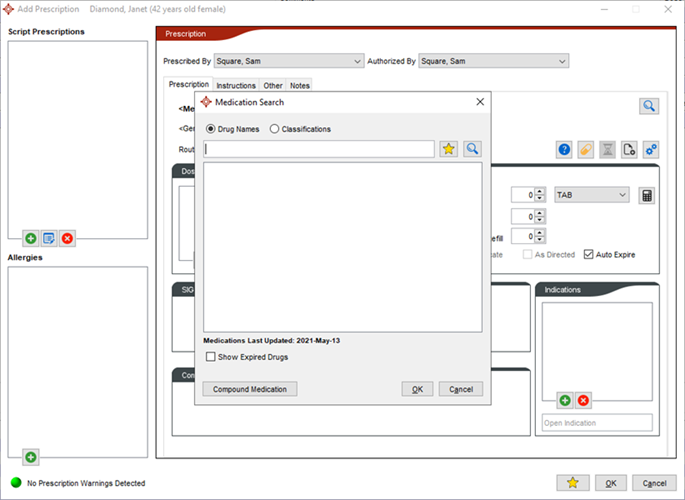
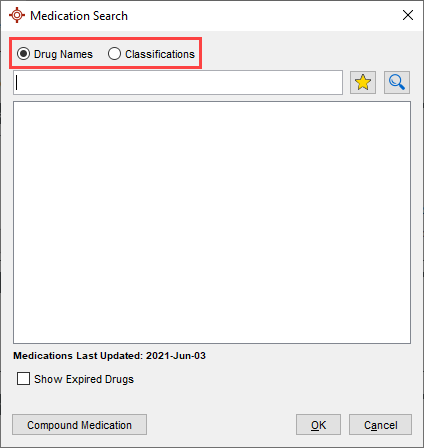
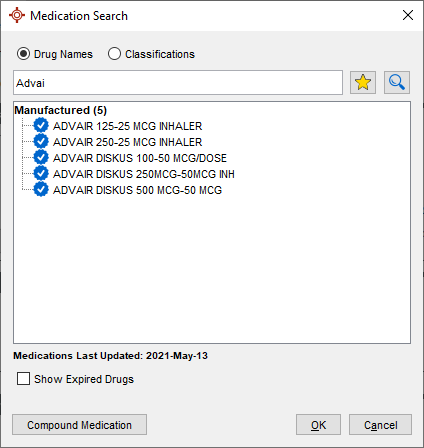
- Select either Drug Names or Classifications as the Manufactured Drug Search. The last selected option will remain highlighted.
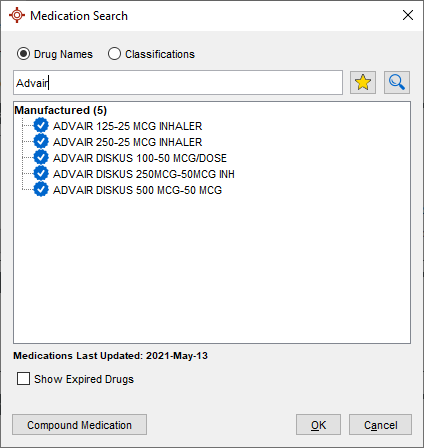
- In the Medication Search field, type in the name of the drug, click the Search button
 .
.
- Click to highlight the correct form of the medication in the list that is displayed and click OK.
- Click the
 and select the appropriate Route.
- Click the and select the Drug Use.
- Click the Add button
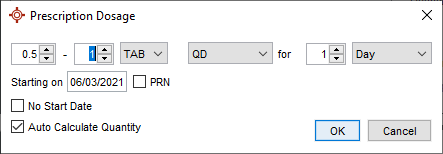
 in the Dosages & Options section and complete the prescription dosage. Click OK to save.
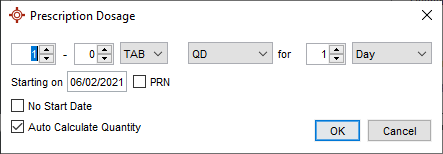
- If the Auto Calculate Quantity checkbox wasn't selected in the previous step, select the Quantity and the Refill numbers.
Note: The Auto Calculate feature only works when the units are consistent with the item prescribed.
- If the Medication has an Exception Form associated with it, clicking the Exception Form button
 will access the Form.
- Click the Add button under the Script Prescriptions header to add more medications to this Script.
Note: If an item is added in error, select prescription in the Script Prescriptions and then click the Delete button  . A confirmation message is displayed, click Yes to confirm and delete.

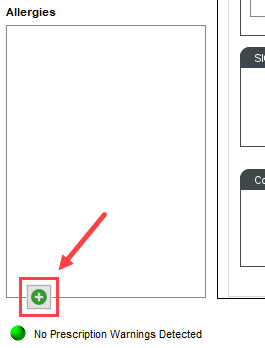
- If the patient mentions any allergies while filling out the prescription, they can be added in the Allergies section of the Add Prescription window. Anything added here will also be displayed in the Medical history area of Encounter Notes.
Note: Editing or Removing allergies is done on the Encounter Notes tab.
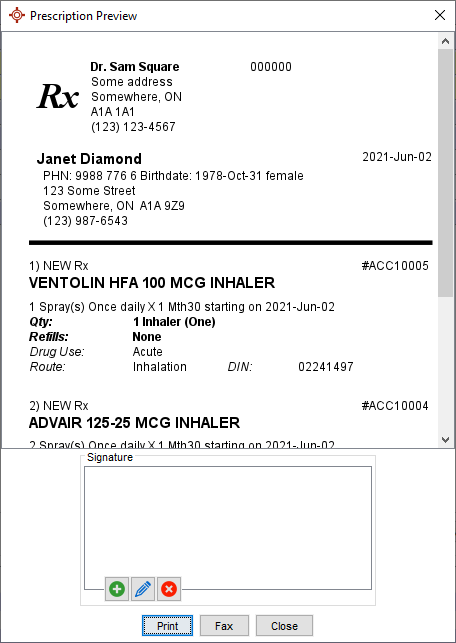
- Click OK. The prescription is saved to the patient's EMR and a copy of it is displayed.
- Click either the Print or Fax button to print a copy or send a copy to a patient's selected pharmacy. The final prescription looks like the example below.
Note: In Ontario, the following is available within the Add Prescription window selections.
- Drug Use has the following options: Acute, Continuous Chronic, One Time, PRN Long Term: As Needed, PRN Short Term: As Needed.
- Prescription Status Lifestyle has the following options: New, Active, Suspended, Aborted, Completed, Obsolete and Nullified.
- ICD10 and Snomed Indicator Search: The indicator search in the Add Prescription window searches on ICD10 and Snomed.
Manufactured Drug Search
When performing a manufactured drug search users can select whether to search by name or by classification. When the search is run only the search type selected is searched (previously each search searched both names and classifications). This speeds up time and efficiency of manufactured drug searches.
Cancel a Prescription
- Click the EMR button on the Accuro Navigation bar.
- Click the Medications tab.
- Double-click on the prescription items you want to cancel. The Manage Prescription window is displayed.
- Right-click the appropriate Prescription under Scrip Prescription.
- Select Cancel Prescription
- Click the Delete button . A deletion confirmation message is displayed.
- Click Yes to confirm. The prescription is cancelled.
Note: If the prescription is less than 24 hours it can actually be deleted. If it is more than 24 hours old it is marked as cancelled rather than being deleted.
Create a Prescription for a Medication with Differing Dosages
This procedure is for when physicians are prescribing a drug and want to vary the dosage over the course of the medication. This can be for items where the practitioner wants to increase the dosage gradually e.g. antidepressants or where a patient may need to be weaned off a drug e.g. steroids.
- Click the EMR section on the Accuro Navigation bar.
- Click the Medications tab.
- Click the New Prescription button. The Add Prescription window is displayed along with the Medication window.
- In the Medication Search window, type in the name of the drug, click the search button .
- Click to highlight the correct form of the medication in the list that is displayed and click OK.
- Click the and select the Route from the list displayed.
- Click the and select the Drug Use from the list displayed.
- Click the Add button in the Dosages & Options section and complete the prescription dosage. Click OK to save.
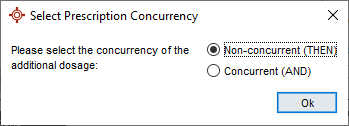
- Click the Add button in the Dosages & Options section again.
- Select if the drug you are adding is to be concurrent or not. The prompt is to select either Non-concurrent (THEN) or Concurrent (AND), click OK.
- Complete the next prescription dosage amount.
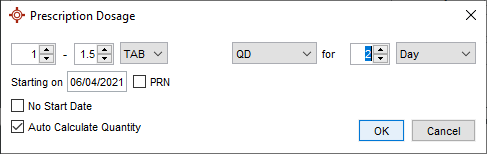
- Click OK to save. Repeat for as many dosage changes as are required.
- Click the Add button In the Dosages & Options section again.
- Click OK.
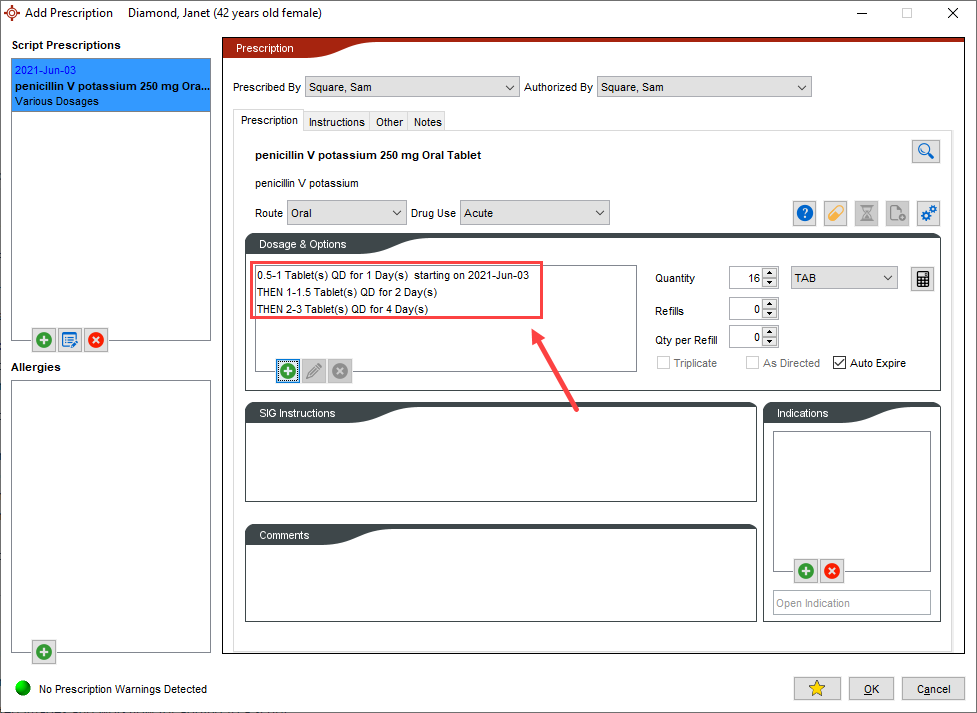
The final prescription looks like the example below.

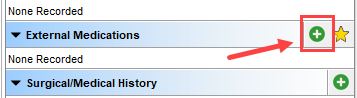
Create a New External Medication
- Click the EMR button on the Accuro Navigation bar.
- Click the Medications tab.
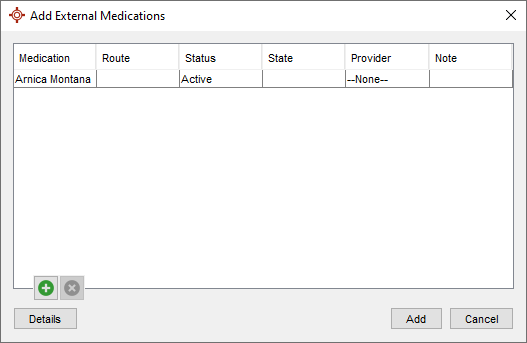
- Click the New External Medication button. The Add External Medication window is displayed with the Drug Search window above it.

- In the Medication Search field, type in the name of the drug, click the search button .
- Click to highlight the correct form of the medication in the list that is displayed. Click Select or Select and New if another external medication is required.
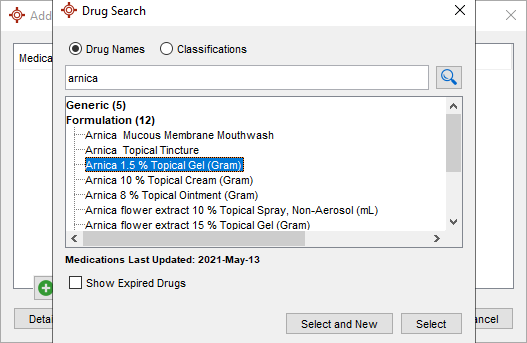
- Click the Select button (to add another external medication click Select and New).
- Update the Route, Status, State, Provider and add any Notes (as necessary).
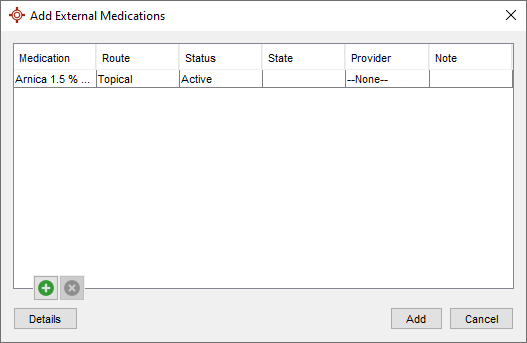
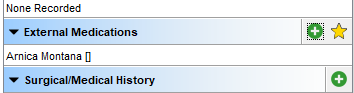
- Click Add to add the Medication to the appropriate section of the Medications tab. The new external medication has been added to the list.
Generic External Medications
Providers can add generic external medications to a Patient's chart without having to include the strength and dosage. This is beneficial when a Patient visits and they can list the medications they take, but are not sure of the strength and dosages. By adding this drugs to a Patients chart (even without the dosage information) means that the External Medications can be more easily included in the Drug-Allergy interactions and Drug-Drug interactions. To add an External Medication without a dosage follow the procedure below:
- Click the EMR button on the Accuro Navigation bar.
- Click the Encounter Notes tab.
- Click the Add button in the External Medications section.
- In the Drug Search window type in the name of the medication, click Search and select from the list displayed.
- Click Select.
- Click Add to save to a patient's chart.
The External Medication is added to the patient's chart without a strength or dosage having to be provided.
Compound Medications
Compound medications are created on the Medications tab of the EMR section of Accuro. Ingredients for compounds are provided by First Data Bank. If an ingredient is not listed then a medication list update is required.
If a dosage warning message is given at the end of a compound prescription a user must go back and change the dose in order for the warning message to be cleared.
Create a Compound Medication
- Click the EMR section on the Accuro Navigation bar.
- Click the Medications tab.
- Click the New Compound Prescription button. The Add Prescription window is displayed with the Compound tab already selected.
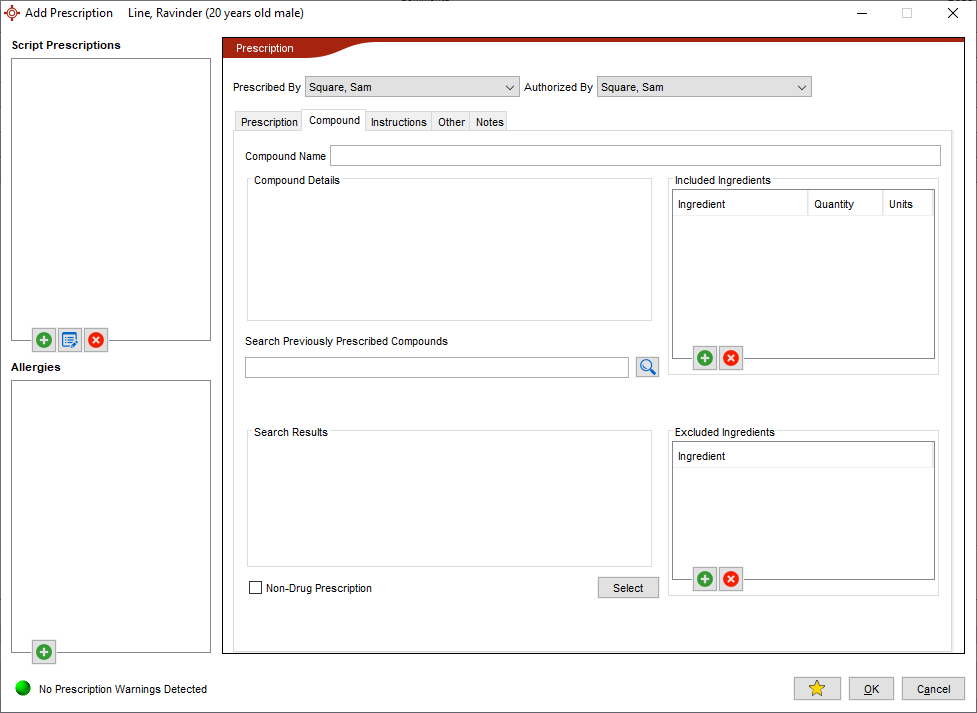
- In the Compound Name field type in the name of the compound being created.
- Click the Add button in the Included Ingredients section. The Medication Search window is displayed.
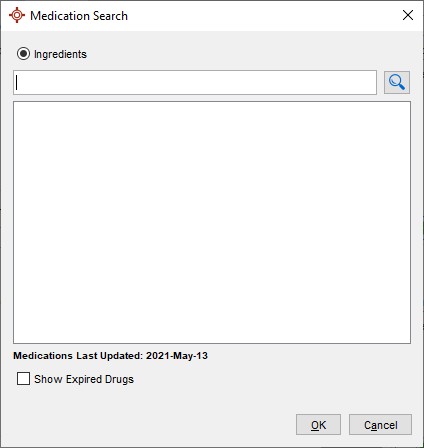
- Type in the name of the ingredient and click the Search button .
- Select the ingredient from the list displayed.
- Repeat steps 5 through 7 for any other ingredients that need adding.
- Click the Add button in the Excluded Ingredients section. The Medication Search window is displayed.
- Type in the name of the ingredient and click the Search button .
- Select the ingredient to be excluded from the list displayed.
- Repeat steps 9 through 11 for as any ingredients that need excluding.

- Click OK to save the compound or Save and New to save the compound and create another new compound.
Favorites
For medications prescribed on a regular basis, add them to the Favorite Prescriptions list. Each Provider can customize their own list with their preferred medications.
Access Favorite Prescriptions
- Click the EMR button on the Accuro Navigation bar.
- Click either the
- Medications tab and select Favorites button
 .
.
- Encounter Notes tab and select the Star button
 beside either Active Medications or External Medications.
- The Favorite Prescription window will open.
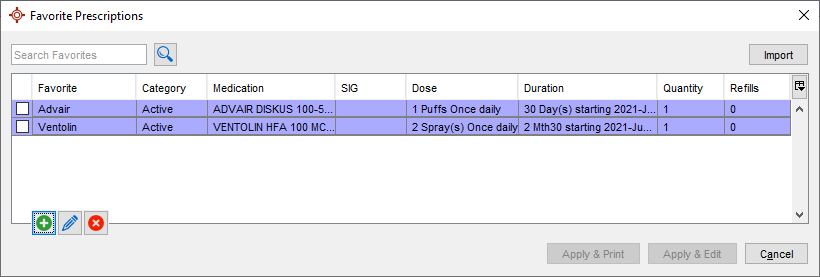
Adding a Prescription to Favorites
- Click the EMR button on the Accuro Navigation bar.
- Click the Medications tab.
- Click the Favorites button . The Favorite Prescription window is displayed.
- Click the Add button and type in a name for your Favorite Drug.
- Click Add button you are now in the Add Prescription window.
- In the Medication Search field type in the name of the medication and click search .
- Click on the correct medication type (e.g. Advair 100 Diskus Disk/Dev) and click OK.
- For Route click and select the route for the medication (the usual route for the drug selected should already be displayed).
- For Drug Use click and select from the list displayed.
- In the Dosages & Options section of the window, click the Add button and select the prescription dosages. Click OK.
- Click OK. The drug is now in the Favorite Prescriptions windows:
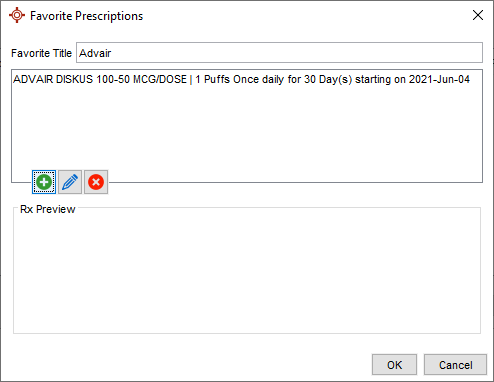
- Click OK to add to your favorites. The medication is now on your favorites list. Access your favorites through the Medication tab
Prescription Summary
- Click the EMR button on the Accuro Navigation bar.
- Click the Medications tab.
- Click the Prescription Summary button. The Prescription Summary window is displayed.
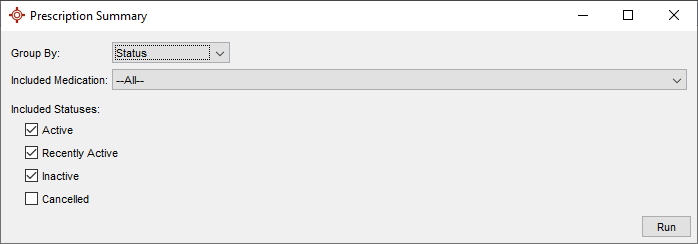
- Click the and select the Group By from the list displayed.
- Click the and select the Included Medication from the list displayed, the default is All.
- Click the checkboxes to include Active, Recently Active, Inactive and Canceled, as required.
Note: By default all checkboxes except Canceled are selected.
- Click Run to generate the summary. The Prescription Summary Preview is displayed.
- Click the Print button
 .
.
- Select the appropriate printer and click OK.
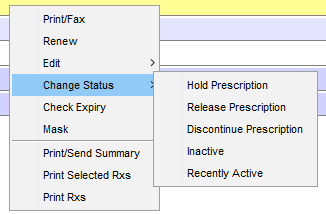
Change the Status of a Medication
- Click the EMR button on the Accuro Navigation bar.
- Click the Medications tab.
- Right-click and select Change Status from the list displayed.
- Select from Hold Prescription, Release Prescription, Discontinue Prescription, Inactive or Recently Active, as required.
If the medication selected is defined as continuous then the Prescription Status window (for more information) is displayed:
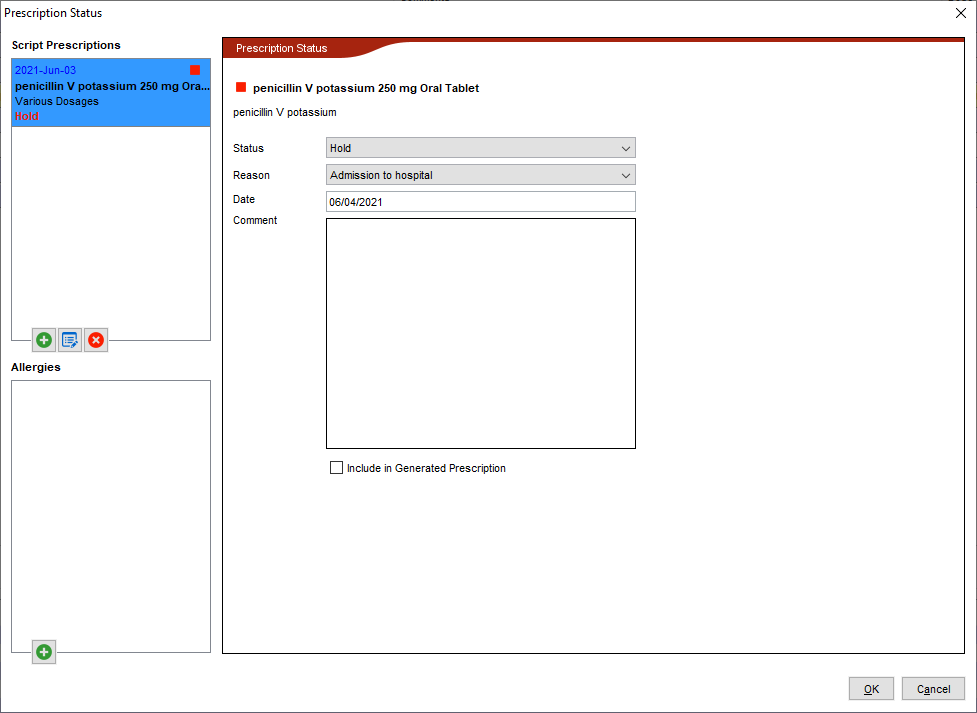
- Click the dropdown and select from the Status option based on the previous Change Status selection.
- Click the dropdown and select the Reason from the list displayed.
- The default in the Date field is today's date. To change the date double-click in the date field and select the correct date in the calendar displayed.
- Type in any Comments, as required.
- Select Include in Generated Prescription to Generate a Prescription with the changes.
- Click OK to save the changes.
Edit SIG
When editing a SIG or renewing a prescription and there is still a quantity of medication remaining, a warning message is added to the pharmacist section to alert the pharmacist. The message states, "Attention: Pharmacist. This script reflects a dosage change with a new refill and quantity instruction/Requirement."
- Click the EMR button .
- Click the Medications tab.
- Click on the appropriate medication.
- Right-click and select Edit and then SIG from the list displayed.
- Update the prescription details, as required.
- Click the to the right of Drug Use, the options are Short Term or Continuous.
- Amend the Quantity, as required.
- Click the
 to search online for drug interactions and detailed information.
- Click the
 to edit the common form the medicine is available in.
- Click the
 to view the Status History.
- Click the to open the Exception Form associated with the medication.
- Click the
 to change your prescription settings.
- Click Renew, Save and Close or Save and New, as required.
Limited Use Drugs (ON)
Users prescribing limited use drugs should put the reason code in the SIG instructions box. To access the SIG Instructions box follow the procedure below:
- Select the appropriate patient.
- Click the EMR button on the Accuro Navigation bar.
- Click the Medications tab.
- Click the New Medication button.
- Then type the reason code for the limited use medication in the SIG Instructions field.
Renew a Medication
Where a medication has already been prescribed to a patient, it is very simple to renew a medication. With the correct patient selected:
- Click the EMR button on the Accuro Navigation bar.
- Click the Medications tab.
- Click to select the appropriate medication. Where there is more than one, hold down the Ctrl key and click the appropriate medications. Selected medications have a yellow background.
- Right-click anywhere on the highlighted medication(s) and select Renew.
- The Manage Prescription window is displayed. If any of the quantities or dosages have changed, update as required. If multiple drugs are being renewed, click each one in the Script History pane and review individually.
- Click OK (or Save and New if more medications are being renewed).
- If prescriptions by different Provider(s) are selected a message is displayed. Medications are grouped separately and printed separately. Click OK.
- Click Print to print the prescription or Fax to send it to the patient's chosen pharmacy. If more than one prescription is displayed, repeat this step, as required.
Mask a Medication
- Click the EMR button on the Accuro Navigation bar.
- Click the Medications tab.
- Right-click on the appropriate medication and select Mask from the list displayed. A red exclamation mark
 is displayed next to this item to indicate that this item is masked.
Print/Fax Summary
- Click the EMR button on the Accuro Navigation bar.
- Select the Virtual Chart or Medications tab.
- Right-click on an active medication and select Print/Fax Summary from the list displayed. The Fax Log window is displayed. A summary of activity on the current selected patient is displayed.
- Click Close when finished.
Reprint a Prescription
If a patient has lost a prescription, it is possible to re-print without having to renew the medications. Select the correct patient:
- Click The EMR button on the Accuro Navigation bar and
- Click the Medications tab.
- In the
 section are listed all medications currently prescribed. Click to select the appropriate medication. If there is more than one, hold down the CTRL button and click on all the appropriate medications.
- Click the Print Prescription button or right-click and select Print/Fax from the list displayed. The prescription is now displayed, select to print in your office or fax directly to the pharmacy.
Change Last Modified Date on External Prescriptions
- Click the EMR button .
- Click the Medications tab.
- Right-click on the appropriate medication and select Change Status from the list displayed.
- Select the status that is the same as the current status of the medication.
View when FDB was Last Updated
- Click the EMR button on the Accuro Navigation bar.
- Click the Medications tab.
- Click the New Prescription button. The Add Prescription window is displayed.
- The date your medications database was last updated is displayed on the left-hand side toward the bottom of the window.
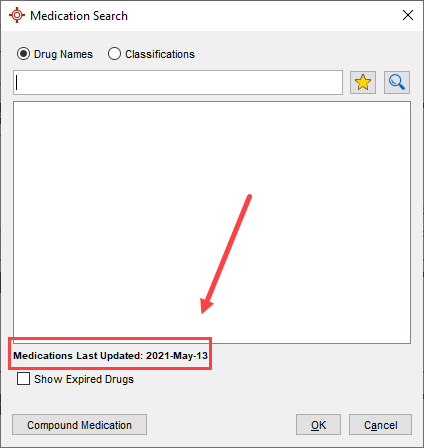
- Click Cancel to close the window without making any changes.
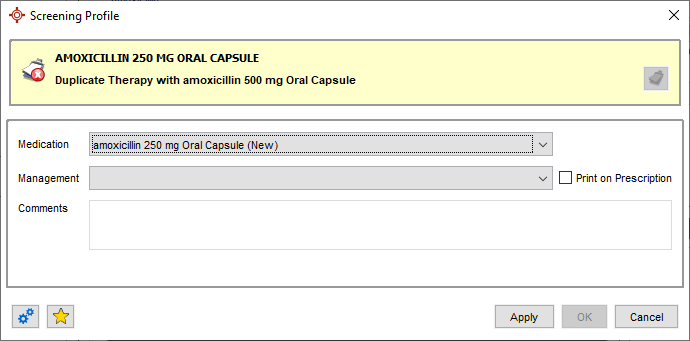
Duplicate Therapies (First Databank Subscribers Only)
Accuro checks for duplicate therapies as per IDDF documentation. This means that when a drug is prescribed for a patient, Accuro checks items that have already been prescribed to ensure that patients are not potentially being prescribed duplicate medications. This works by comparing the ingredients of a newly added drug to the active ingredients of drugs in the patient's profile, and then checking the new drug against a specialized Duplicate Therapy Class. If Accuro detects a conflict then a warning message is displayed.
A message is displayed in the Prescription management window to remind users that the management option they select is not actually performing the action. By selecting the option they are stating their intentions in managing the duplicate therapies. When one of the managements listed below apply, an information icon is displayed (between the management dropdown and the Print on Prescription checkbox) and a tooltip reminding the user that the management is not automatically performed:
- Put Profile Drug on Hold
- Discontinue existing Rx and proceed with new pending Rx
- Start new pending Rx after existing Rx
- Add new pending Rx to existing Rx
Prescription Management Warning Messages
The following are the types of warning messages that can be seen when creating or renewing a prescription.
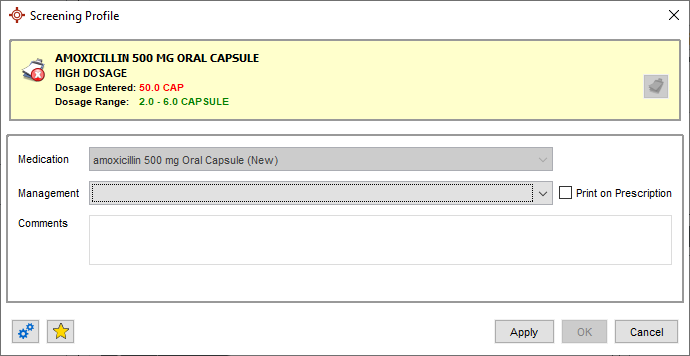
Low Dosage Warning

High Dosage Warning
Duplicate Therapy Warning
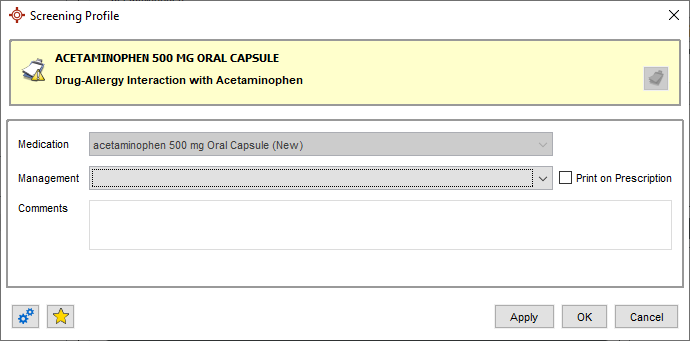
Drug-Allergy Warning
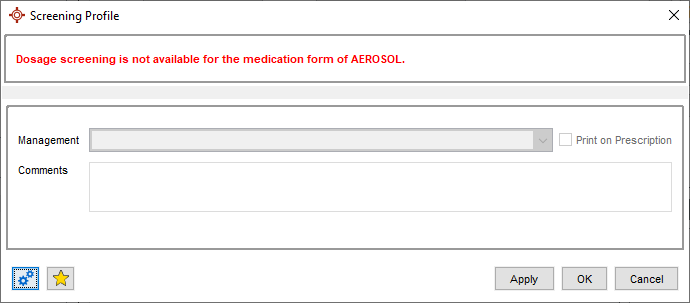
Dosage Screening for Inhalation of Medications
Drug Allergy Management
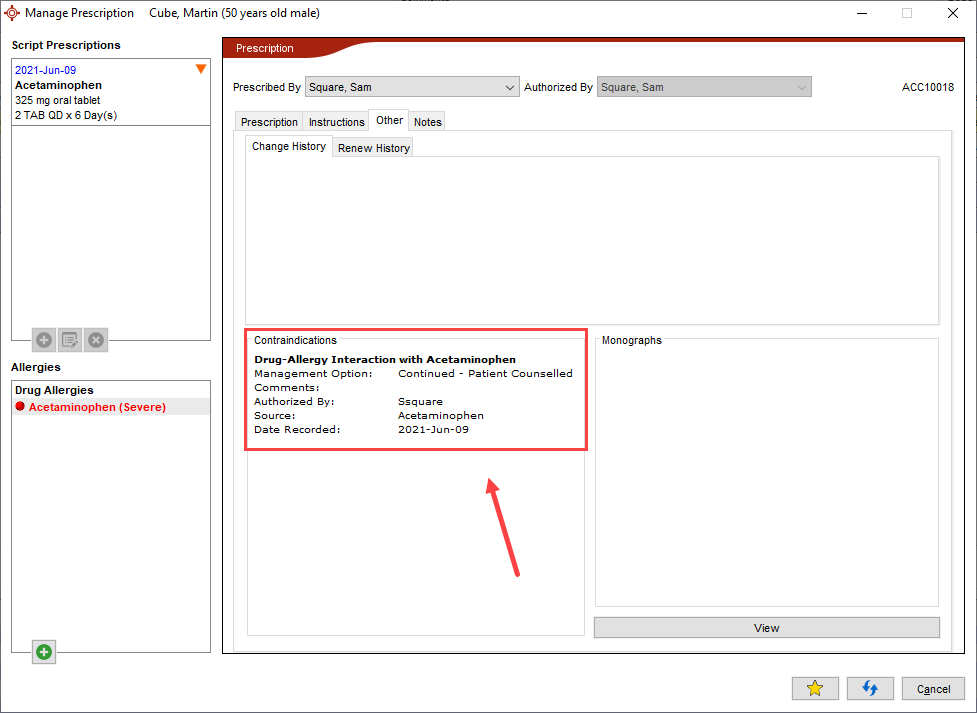
When a medication is prescribed and a patient allergy is flagged a warning is displayed at the bottom of the Add Prescription window.
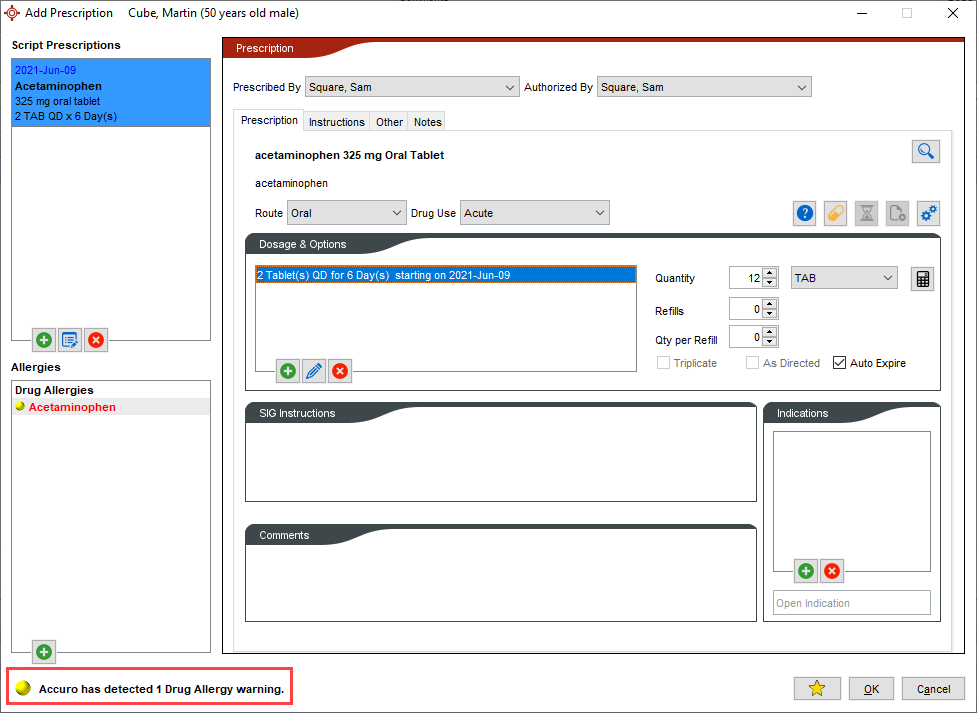
- To access allergy management click the icon next to the warning (in the example above the yellow circle). This displays the Drug Interaction Management window.
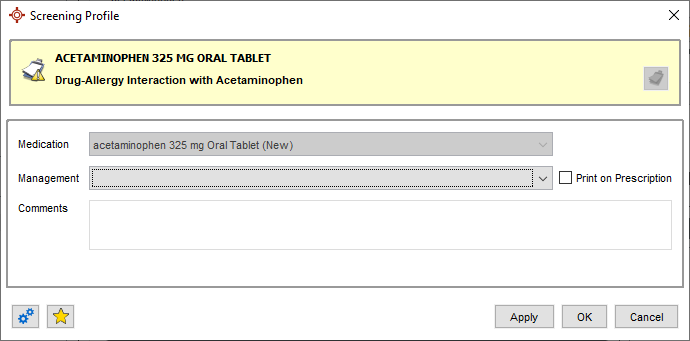
- Click the to the right of Management and select the appropriate option from the list displayed.
- Click the Print on Prescription checkbox, if applicable.
- Click Apply and OK to save changes. The information is recorded and displayed on the Other tab of the Manage Prescription window
Disable Low Dose Warning
In order to disable low dose warnings you must be logged in as a Provider with the "Physician" Role. No other roles have access to this checkbox.
- Click the Accuro Start Menu.
- Select Tools followed by Preferred Prescription Managements.
- Click the Interaction Management Levels tab.
- Deselect the Show Low Dosage Alerts checkbox.
Note: The default for the Show Low Dosage Alerts checkbox is selected.
Triplicate Drug Exemptions (AB)
When a drug is flagged as triplicate the DIN is checked to see if it is in the exemption table. If the DIN is in the exemption table then the triplicate flag for the prescription is turned off.
If you require DIN's added to your clinic exemption table please contact QHR Technologies.
Medication, Reconciliation and Order Form (MB)
A form for specific regions of Manitoba called the Medication Reconciliation and Order Form is available on the Medications tab. This form is only visible if your site has the appropriate module enabled in Accuro. This form is generated from a button in the medications tab.
This form includes all the patient demographics in the top-right corner, a list of allergies/intolerances and medications that the patient has been taking (active and external medications). If there are too many medications for one page, then the report will carry on to a second page.
To access this form follow the procedure below:
- Select the EMR icon .
- Click the Medications tab.
- Click the Reconciliation & Order Form button.
- When the form has been created it can be printed or faxed.
- Click Close and save to the patient's chart, if required.