Medical History Bands
The Medical History Bands are located on the Encounter Notes tab in the EMR section of Accuro. These display a summary of your patient's history divided into appropriately named sections.
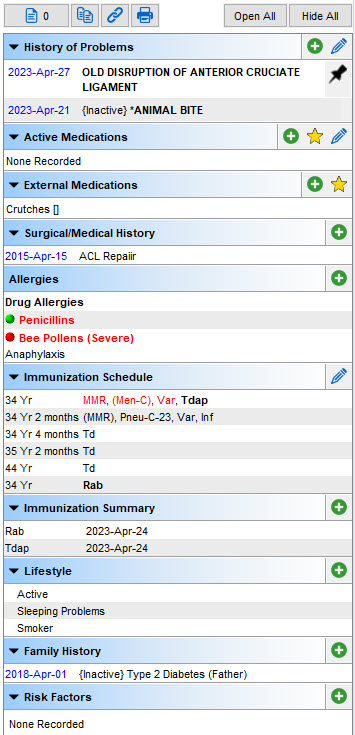
Document Comparison button  - Allows users to compare two documents in the Encounter Notes. See Compare Two Documents in Encounter Notes for more information.
Copyable History button  - Allows users to copy a summary of the Medical History bands. See Copy Medical History for more information.
Link button  - Allows users to link Appointments, Clinical Notes, Documents, Prescriptions, Lab Result Types, Labs, and Histories to a Problem. See Link Information to a Problem for more information.
Print button  - Allows users to print a summary of the Medical History bands. See Print Copied Medical History for more information.
Open All button - All Medical History bands will expand.
Hide All button - All Medical History bands will collapse. Note: The Allergies band will remain expanded.
Medical History Band Configuration
Expanding and Collapsing the Medical History Bands
Medical History Bands can be expanded or collapsed one at a time by clicking 
 as required or all at once by clicking Open All or Hide All above the Medical History Bands. This can be helpful to reduce the amount of scrolling when a patient has a lot of information.
When a Medical History Band is collapsed, the number of items hidden from view is displayed in the ribbon (with the exception of the Allergies band).
The expanded or collapsed state is remembered until a new patient is loaded and the bands then default to expanded again.
Remembering the Collapsed State of the Medical History Bands
There is a User Preference available, that when enabled, ensures that Accuro remembers the collapsed / open state of the Medical History Bands. this can be found by following the procedure below:
- Press and release Alt on the keyboard or click the Accuro Start Menu button
 .
.
- Click File and select User Preferences.
- Click Display and select the EMR Workflow tab.
- Select the Remember Collapsed State of Medical History Bands checkbox.
When selected, Accuro remembers the collapsed / open state on a patient by patient (and user by user) basis and is useful if you find yourself always collapsing certain bands for certain patients.
By default, this user preference is not enabled.
- Click Apply and OK to save any changes.
Note: You need to log out of Accuro and back in again for the changes to take effect.
Edit Medical History Band in Encounter Notes
The Medical History Bands on the right-hand side of the Encounter Notes tab can be customized. There are once provided in Accuro as standard that can be displayed/hidden as required and users can create additional ones, as required.
- Press and release Alt on the keyboard or click the Accuro Start Menu button .
- Click Users and select Manage Security from the list displayed.
Note: Manage Security is only available to users with the System Administrator permission.
- Click the System Settings tab down the left-hand side.
- Click the Configure Histories button at the bottom of the window. The Edit Custom History Types window is displayed.

- Select the checkboxes
 to enable the display of the Medical History Band. To disable a band, deselect the checkbox
  . The disabled types are not displayed in the copyable medical history, macros in templates, on the right-hand side of the Encounter Notes tab, in the Medical History area (at the bottom of the clinical notes section) or in generated letters (the medical history popup).
Add Custom Medical History Band in Encounter Notes
- Press and release Alt on the keyboard or click the Accuro Start Menu button .
- Click Users and select Manage Security from the list displayed.
Note: Manage Security is only available to users with the System Administrator permission.
- Click the System Settings tab down the left-hand side.
- Click the Configure Histories button at the bottom of the window. The Edit Custom History Types window is displayed.
- To add a Custom Band click the Add button
 . The Edit Custom History Types window is displayed.

- Type in the name of the custom band and select the band type.
Note: If you select Tracking you can also select the requires date checkbox.
- Click OK to save any changes.
- A prompt will display asking "Should this Medical History band only be available for the selected office?" If No is selected it is available to all offices. If Yes is selected the band is only available for the office selected in the Office dropdown. See LINK to below section for how to add an office in this window.
Add an Office for Clinic Specific Medical History Bands
In order to have Medical History bands specific to your clinic, you need to add your clinic.
- Press and release Alt on the keyboard or click the Accuro Start Menu button .
- Click Users and select Manage Security from the list displayed.
Note: Manage Security is only available to users with the System Administrator permission.
- Click the System Settings tab down the left-hand side.
- Click the Configure Histories button at the bottom of the window. The Edit Custom History Types window is displayed.
- Click the Add button to the right of the Office dropdown to add an office.
Note: You may need to restart Accuro for these changes to take effect.
Remove / Disable a Medical History Band in Encounter Notes
- Press and release Alt on the keyboard or click the Accuro Start Menu button .
- Click Users and select Manage Security from the list displayed.
Note: Manage Security is only available to users with the System Administrator permission.
- Click the System Settings tab down the left-hand side.
- Click the Configure Histories button at the bottom of the window. The Edit Custom History Types window is displayed.
- For any Custom Bands that do not have any data, click the Remove button
 . The Custom Band you selected is deleted from the list displayed.
OR
If in use or a default band, deselect the Enabled checkbox next to the desired band you would like to disable. The disabled types are not displayed in the copied medical history, macros in templates, on the right-hand side of the Encounter Notes tab, in the Medical History area (at the bottom of the clinical notes section) or in generated letters (the medical history popup).
- Click OK to save any changes.
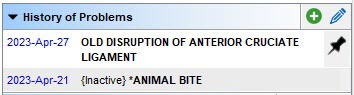
History of Problems
Add a History of a Problem in Encounter Notes
- Click the EMR button
 on the Accuro Navigation bar and click the Encounter Notes tab.
- Click the Add button on the History of Problems band.
- Type in the Diagnostic Description or Code and click the Search button.
- Click to select a problem from the list displayed and click Select. If you are entering more than one problem, click Select and New. The selected problems are added to the History of Problems band.
- Type in the Onset Date and Date of Diagnoses - these fields will default to the current date.
- Type in a Description.
- Click the dropdown list
 and select the Status from Active, Inactive, Suspected and Recovered.
- If Inactive or Recovered were selected for the Status click the Calendar field to the right of the Status and select the date when the Status became inactive or recovered.
- Click the Ellipses button
 and search for the appropriate symptoms.
- Click the dropdown list and select the Life Stage from the list displayed.
- Type in any Notes, if applicable.
- Click Apply and OK to save your changes.
Edit a History of a Problem in Encounter Notes
- Click the EMR button on the Accuro Navigation bar and click the Encounter Notes tab.
- Click the Edit button
 on the History of Problems band.
- Select the desired History of Problem from the list.
- Make the desired changes.
- Click Apply and OK to save your changes.
Remove a History of a Problem in Encounter Notes
- Click the EMR button on the Accuro Navigation bar and click the Encounter Notes tab.
- Click the Edit button on the History of Problems band.
- Select the desired History of Problem from the list.
- Click Delete and in the confirmation window, click Yes.
- Click Apply and OK to save your changes.
Prioritizing Problems in History of Problems
Users can prioritize important diagnoses by pinning what they consider to be the most important problems. When a problem has been pinned it is displayed at the top of the History of Problems section. If more than one problem is pinned, then those pinned are displayed at the top in reverse chronological order. Once pinned, they appear pinned to all users.
To pin a problem follow the procedure below:
- Click the EMR button on the Accuro Navigation bar and click the Encounter Notes tab.
- Right-click on the problem that is desired to be pinned in the History of Problems band and select Pin Problem. This item is now displayed at the top of the History of Problems band with a pin icon
 .
.
Link Information to a Problem
If a problem is linked to Appointments, Clinical Notes, Documents, Prescriptions, Lab Result Types, Labs, and/or Histories, when you click on the Problem from the History of Problems band, only the linked information will display in the Encounter Notes tab. This allows only desired information related to the problem to display at once.
Note: To have all of the patient's information to display in the Encounter Notes tab, click the problem from the History of Problems band once again or click the Back button  .
.
- Click the EMR button on the Accuro Navigation bar and click the Encounter Notes tab.
- Click the desired problem from the History of Problems band that you want to link Appointments, Clinical Notes, Documents, Prescriptions, Lab Result Types, Labs, and/or Histories to.
- Click the Link button .
- In the Link Manager window, click the Add button for the desired information to link to the problem.

- Once complete, click Apply and OK.
Remove Linked Information to a Problem
- Click the EMR button on the Accuro Navigation bar and click the Encounter Notes tab.
- Click the desired problem from the History of Problems band that you want to unlink from Appointments, Clinical Notes, Documents, Prescriptions, Lab Result Types, Labs, and/or Histories.
- Click the Link button .
- In the Link Manager window, click the desired information and then the Remove button .
- Once complete, click Apply and OK.
Active Medications
Add an Active Medication in Encounter Notes
- Click the EMR button on the Accuro Navigation bar and click the Encounter Notes tab.
- Click the Add button on the Active Medications band.
- Type in the Drug Name and click the Search button
 .
.
- Double-click or click Select to select a drug from the list displayed. Complete the dosage and instructions, as required.
- Click Save and Close to generate the prescription. To add another drug, click Save and New.
Remove an Active Medication in Encounter Notes
- Click the EMR button on the Accuro Navigation bar and click the Encounter Notes tab.
- Click on the desired medication in the Active Medications band.
- In the Script Prescriptions panel, right-click and select Cancel Prescription and in the confirmation window, click Yes.
Note: This will additionally remove the medication from the Medications tab.
Copy a Prescription Macro
When a prescription macro is copied from one Provider to another, the Provider in the macro becomes the new Provider the prescription has been copied to.
To import a prescription macro:
- Select the EMR icon on the Accuro Navigation bar and click the Encounter Notes tab.
- Click the Gold Star
 to the right of the Active Medications band.
- Click the Import button in the Favorite Prescriptions window.
- Select the macros from the list displayed and click OK. The macro is copied and added to the Favorite Prescription list.
Ontario Drug Benefit Formulary and Limited Use Codes (ON)
When searching for a medication in Accuro drugs covered by drug benefit program are indicated by an icon and a tooltip (when the user hovers the mouse over the drug). Additionally some drugs are covered in limited situations where specific medical conditions exist. These require a limited use code to be recorded on the prescription. A Limited User dropdown is located on the Prescription tab in the Add Prescription window for users to select the appropriate Limited Use code. The Limited Use criteria are only visible when available for the selected medication to ensure the user selects the correct Limited Use code when multiple options may be available. A tooltip describes the Limited Use code when a user hovers the mouse over the appropriate medication.
To access the Add Prescription window follow the procedure below:
- Select the EMR icon on the Accuro Navigation bar and click the Encounter Notes tab.
- Click the Encounter Notes tab.
- Click the Add button in the Active Medications band.
External Medications
Alternative Health Products are not coded with Drug Identification Numbers and are not able to be part of any drug to drug interaction checking, clinical alerts, allergy checking, or dosage warnings. They are simply free text entry in the medication list.
Add an External Medications in Encounter Notes
- Click the EMR button on the Accuro Navigation bar and click the Encounter Notes tab.
- Click the Add button on the External Medications band.
- Type in the Drug Name and click the Search button .
Note: You may need to open the collapsed headers in the list, such as "Natural Health Products", "Alternative", etc., to locate the desired external medication. The number in brackets indicates the number of matches to your search.
If you do not see the expected external medication, it may need to be added to Accuro. Please see Add an Alternative Health Product for instructions.
- Double-click to select a drug from the list displayed. Click Select, to add another drug, click Select and New. Repeat to add as many drugs as necessary.
- Enter the remaining details.
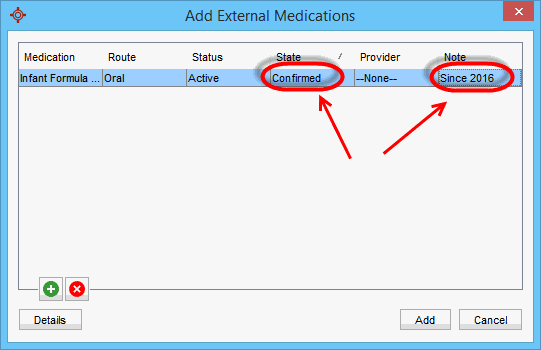
- Click the Add button to add the selected drugs to the External Medications band.

Edit an External Medications in Encounter Notes
- Click the EMR button on the Accuro Navigation bar and click the Encounter Notes tab.
- Click the desired item from the External Medications band.
- Edit the desired fields.

- Click OK.
Remove an External Medications in Encounter Notes
- Click the EMR button on the Accuro Navigation bar and click the Encounter Notes tab.
- Click the desired item from the External Medications band.
- Click the Remove button and click Yes in the confirmation window to remove the External Medication.
Surgical / Medical History
Add a Surgical / Medical History
- Click the EMR button on the Accuro Navigation bar and click the Encounter Notes tab.
- Click the Add button on the Surgical/Medical History band. The Surgical/Medical history window is displayed.

- Type in the name in the History field.
- Click the Edit button and click the Add button to add a name and/or a code.
- Click OK to save. More names/codes can be added, as required. Click Close when completed.
- Click the dropdown list and select the Class from the list displayed.
- Click the dropdown list and select the Details from the list displayed.
- Add a Note, if desired.
- Double-click and select the appropriate Date from the calendar displayed.
- If there is an End Date, double-click and select the end date from the calendar displayed.
- Add a date and click the dropdown list to add a Status.
- Select a Life Stage, if desired. This field will auto-populate depending on the Date selected.
- Click Save and Close to save the information. To continue adding more surgical/medical history click Save and New.
Edit a Surgical / Medical History
- Click the EMR button on the Accuro Navigation bar and click the Encounter Notes tab.
- Double-click the desired item from the Surgical/Medical History band.
- Edit the desired fields.
- Click Save and Close.
Note: To see any previous records for Surgical / Medical History, click the Item History button  and select the date from the left-hand panel to display further details.
Remove a Surgical / Medical History
- Click the EMR button on the Accuro Navigation bar and click the Encounter Notes tab.
- Double-click the desired item from the Surgical/Medical History band.
- Click Delete and click Yes in the confirmation window to remove the External Medication.
Allergies
Add an Allergy
- Click the EMR button on the Accuro Navigation bar and click the Encounter Notes tab.
- Click the Add button on the Allergies band.
- Type in the name of the allergy and select from the list displayed.
- Click OK to save. If you are entering more than one allergy, click Save and New. The allergy is added to the Allergy section.
- Add in additional information, such as Reaction Date, Severity, etc. as desired.

- Add Reactions as applicable by clicking the Add button under Reaction and selecting the reaction from the dropdown, the Severity, and a Description. Repeat for all required reactions.
- Click OK.
Note: If there any interactions between the allergies added and items prescribed for the patient the Screening Profile window is displayed.
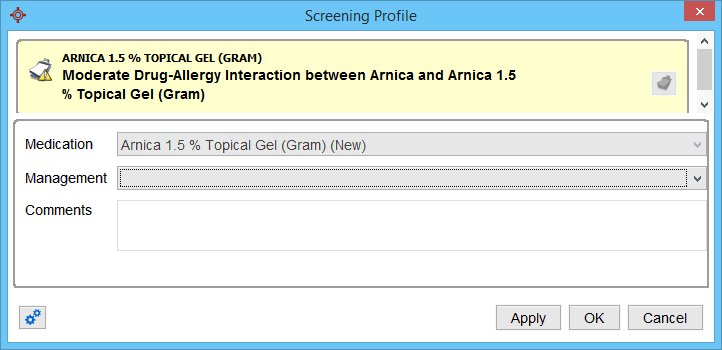
Note: Where items have the same severity then can be selected (using Ctrl+Click or Shift+Click) and managed at the same time. Items with different severities must be managed separately.
- Click the dropdown list and select the management from the list displayed.
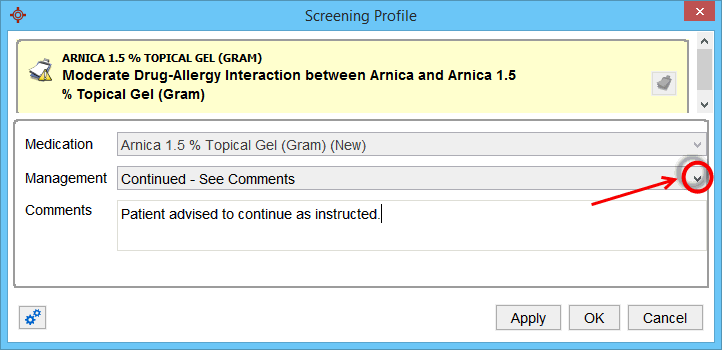
- Type in any comments.
- Click Apply and then OK to save the managements.
- The allergy information is updated in the bottom of the Medications tab.
Add a Reaction
To add a reaction, see Add an Allergy.
Edit an Allergy
- Click the EMR button on the Accuro Navigation bar and click the Encounter Notes tab.
- Double-click the desired item from the Allergies band.
- Edit the desired fields.
To remove/edit a Reaction, click the reaction, edit the fields or click the Remove button .
- Click OK.
Edit / Remove a Reaction
To add a reaction, see Edit an Allergy.
Remove an Allergy
- Click the EMR button on the Accuro Navigation bar and click the Encounter Notes tab.
- Double-click the desired item from the Allergies band.
- Click Remove and click Yes in the confirmation window to remove the Allergy.
Immunization Schedule
Add Immunization Schedule
- Click the EMR button on the Accuro Navigation bar and click the Encounter Notes tab.
- Click the Edit button on the Immunization Schedule band. The Patient Immunization Schedule window is displayed.
- Click the dropdown list and select the Immunization Schedule from the list displayed. Click the Add button to add any extra vaccinations you want to include that aren't listed on the selected vaccination schedule. Follow Administer a Vaccine (link to Administer a Vaccine).
- Click Close.
Remove Immunization Schedule
- Click the EMR button on the Accuro Navigation bar and click the Encounter Notes tab.
- Click the Edit button on the Immunization Schedule band. The Patient Immunization Schedule window is displayed.
- Click the dropdown list and select --None--.
- Click Close.
Administer a Vaccine
Note: Fields with  in the corner are mandatory and must be completed.
- Click the EMR button on the Navigation bar and click the Encounter Notes tab.
-
Double click the next vaccine due on the patient's Immunization Schedule band or click the Add button in the Immunization Summary band.
Note: More than one vaccine can appear in an immunization age. If you click on a vaccine that has an immunization age higher than the patient's age, a warning message is displayed.
OR
- Click the Edit button on the Immunization Schedule band. The Patient Immunization Schedule window is displayed.
- Click the Add button .
- The Vaccine window is displayed and select the desired vaccine and click OK. To add vaccines to list, see Manage Vaccines.
- The Patient Immunization window is displayed:
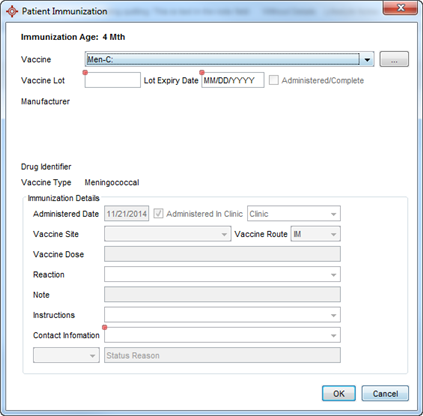
- Click the dropdown list and select the appropriate vaccine from the list displayed.
- To select a vaccine not displayed in the dropdown list, click the Ellipses button
 and search on the drug name.
- Select the desired drug and click OK.
- Type in the Vaccine Lot number.
- Choose an Expiry Date.
- Click the checkbox beside Administered/Complete.
- Double-click the Administered Date field and select the date from the calendar displayed.
- If the vaccine was not administered in the clinic, deselect the Administered in Clinic checkbox, click the dropdown list and select a location from the list displayed.
- Click the dropdown list and select a Vaccine Site from the list displayed.
- Click the dropdown list and select a Vaccine Route from the list displayed.
- Click the dropdown list and select a Reaction from the list displayed, if any.
- Type any additional information in the Note field, if required.
- Click the dropdown list and select Contact Information from the list displayed.
- Click OK.
Note: Any vaccines added will be automatically listed in the Immunization Summary band.
Remove a Vaccine
- Click the EMR button on the Navigation bar and click the Encounter Notes tab.
- Double click the desired vaccine on the patient's Immunization Schedule band or click the Add button in the Immunization Summary band.
- The Patient Immunization window is displayed:
- Click the checkbox beside Administered/Complete to deselect.
- Click OK and click Yes in the confirmation window.
Note: Any vaccines removed will be automatically unlisted in the Immunization Summary band.
Print Immunization Schedule
The Immunization Schedule contains the patient's Name, Date of Birth, Health Card #, Family Physician, Immunization Schedule and details of any immunizations given.
- Click the EMR button on the Navigation bar and click the Encounter Notes tab.
- Click the Edit button in the Immunization Schedule band.
- Click the Print button.
- Select the appropriate printer and click OK.
Immunization Summary
Add Immunization Summary
To start adding to the Immunization Summary, add a vaccine as outlined on Administer a Vaccine.
Print Immunization Summary
To print a summary of immunizations, see Print Immunization Schedule.
Lifestyle
Add Lifestyle Information
- Click the EMR button on the Accuro Navigation bar and click the Encounter Notes tab.
- Click the Add button on the Lifestyle band. Click to select from the list displayed.
If the lifestyle issue you require is not listed, click the Edit button , then the Add button . Type in the name of the issue and click OK. Click Close to exit the window.
Note: Lifestyle issues displayed in red are deactivated and should not be used. They cannot be deleted as they have been used in the past.
- Click to select a problem from the list displayed and enter in the desired information.

- Click Save and Close. If you are entering more than one problem, click Select and New.
Edit Lifestyle Information
- Click the EMR button on the Accuro Navigation bar and click the Encounter Notes tab.
- Double-click the item from the Lifestyle band.
- Edit the desired fields.
- Click Save and Close.
Remove Lifestyle Information
- Click the EMR button on the Accuro Navigation bar and click the Encounter Notes tab.
- Double-click the item from the Lifestyle band.
- Click Delete and Yes on the confirmation window.
Family History
Add Family History
- Click the EMR button on the Accuro Navigation bar and click the Encounter Notes tab.
- Click the Add button on the Family History band.
- Click to select from the list displayed.

- If the Family History item you require is not listed, click the Edit button to add.
- Click the Add button , type in the name of the diagnosis and click OK. Click Close to exit the window.
- Add the desired information like Details, Date, Status, etc.
- Click Save and Close. If you are entering more than one family history item, click Select and New.
Edit Family History
- Click the EMR button on the Accuro Navigation bar and click the Encounter Notes tab.
- Double-click the item from the Family History band.
- Edit the desired fields.
- Click Save and Close.
Note: To see any previous records for Family History, click the Item History button and select the date from the left-hand panel to display further details.
Remove Family History
- Click the EMR button on the Accuro Navigation bar and click the Encounter Notes tab.
- Double-click the item from the Family History band.
- Click Delete and Yes on the confirmation window.
Risk Factors
Risk Factors is only displayed in the Encounter Notes if your clinic has the Risk Factor Tracking module enabled by QHR Technologies. If you'd like this module enabled, please contact our Accuro Client Services.
Add a Risk Factor
- Click the EMR button on the Accuro Navigation bar and click the Encounter Notes tab.
- Click the Add button on the Risk Factors band and the risk factor window is displayed:

- Click the dropdown list and select the Risk Type from the list displayed.
If the Risk Type is not listed, see Add a Risk Type.
- Type in the Start Date, to use the calendar double-click in the start date field.
- The Life Stage is selected automatically as long as a date of birth pas been added for the patient.
- Type in the End Date, to use the calendar double-click in the start date field.
- Type in any Exposure Details and Notes, as required. These fields are free text.
- Click OK to save the risk factor.
Edit a Risk Factor
- Click the EMR button on the Accuro Navigation bar and click the Encounter Notes tab.
- Click risk factor from the Risk Factor band.
- Edit the desired fields.
- Click OK.
Note: To see any previous records for Risk Factors, click the Item History button and select the date from the left-hand panel to display further details.
Remove a Risk Factor
- Click the EMR button on the Accuro Navigation bar and click the Encounter Notes tab.
- Click the item from the Risk Factor band.
- Click Delete and Yes on the confirmation window.
Add a Risk Type
- Click the EMR button on the Accuro Navigation bar and click the Encounter Notes tab.
- Click the Add button on the Risk Factors band and the risk factor window is displayed:
- Click the dropdown list next to Risk Type and select Manage from the list displayed.
- Click the Add button .
- Type in the name of the new Risk Factor, click OK.
Edit a Risk Type
- Click the EMR button on the Accuro Navigation bar and click the Encounter Notes tab.
- Click the Add button on the Risk Factors band and the risk factor window is displayed:
- Click the dropdown list next to Risk Type and select Manage from the list displayed.
- Select the risk factor being edited and click the Edit button .
- Update the risk factor name, click OK to save the changes.
Remove a Risk Type
- Click the EMR button on the Accuro Navigation bar and click the Encounter Notes tab.
- Click the Add button on the Risk Factors band and the risk factor window is displayed:
- Click the dropdown list next to Risk Type and select Manage from the list displayed.
- Select the risk factor being removed, click the Remove button , and click Yes on the confirmation window.
Life Stage
Life Stage is available in several Medical History bands such as History of Problems, Lifestyle, Family History, and Risk Factors.
The options available for life stage are:
- Newborn: Birth - 28 days
- Infant: 29 days to less than 2 years
- Child: 2 years to 15 years
- Adolescent: 16 to- 17 years
- Adult: 18 years or older
If enough data is entered to be able to calculate a patient's age, then Accuro will calculate and update this field for existing histories.
Update Life Stage
- Click the EMR button on the Accuro Navigation bar and click the Encounter Notes tab.
- Click the Edit button on the History of Problems band or click the item in the Lifestyle, Family History, or Risk Factors Medical History Bands.
- Click the dropdown list to the right of Life Stage and select as appropriate.
- Click Apply and OK or Save and Close to save your changes.
Copy Medical History
- Click the EMR button on the Accuro Navigation bar and click the Encounter Notes tab.
- Click the Copyable History button . The Copy Medical History window is displayed.
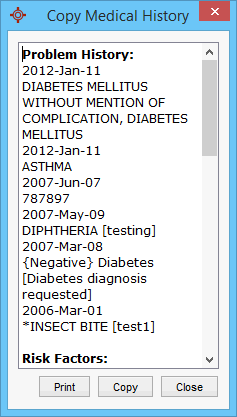
- Click the Copy button. All the information is copied to your clipboard and the window is closed. This information can be pasted into any document you desire, such as an Encounter Note.
Note: If Medical History Band is disabled within Systems Settings, it will not appear in the copied medical history.
Print Copied Medical History
- Click the EMR button on the Accuro Navigation bar and click the Encounter Notes tab.
- Click the Copyable History button . The Copy Medical History window is displayed and click the Print button.
OR
Click the Print button above the Medical History bands.
- Select the printer and click OK.
Display Medical History in Encounter Notes and Generated Letters
To display a patient's medical history within an encounter note or letter, see Display Medical History in Encounter Notes and Generated Letters.