Tips for Billing
- Have Maximize Billing selected (Billing > Maximize Billing, when selected has a tick next to it). This optimizes the order of items listed in a claim to maximize the amount of money paid.
- Use Manage procedures to set up billing details for items that are not covered by MSP e.g. sick notes and driver's medical (Billing > Options > Manage Procedures).
- To check cut-off dates, go to your Accuro calendar it has the cut-off dates listed for the entire year.
- Bills can be submitted as often as you like. There is no need to leave them until just before the submission cut-off dates.
View Your Cut-Off Dates
Cut-Off dates vary from Province to Province. The calendar in Accuro contains the cut-off dates for your province. These are put in the calendar by QHR for the whole year as a reminder of when submissions need to be made.
There is no need to wait until just before a cut-off date to make submissions. Submissions can be made at any time and as many times as required in a billing period. For large office, submitting daily or two/three times a week can aid to the smooth running of the office.
The cut-off dates are displayed in both the Office Calendar and the Provider Calendar.
To view cut-off dates:
- Click the Scheduler button
 on the Accuro Navigation bar.
- Click the Calendar button located at the bottom of the window.
- Click the Office Calendar or Provider Calendar tab. The office calendar is now displayed.
Note: To make cut-off dates to be visible on the hard copy of a calendar, add them to the calendar as calendar notes. For more help on calendar notes please see Create a Calendar Note.
Export / Import from One Accuro System to Another
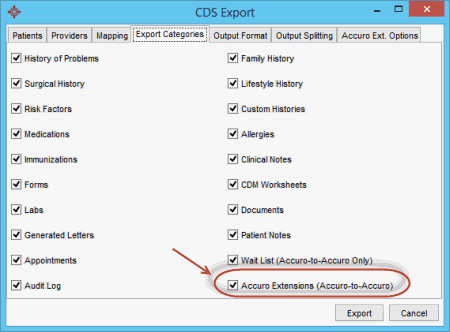
If the file you are exporting is going to be imported into another Accuro system then it is essential that the Accuro Extension checkbox is selected. To correctly export from one Accuro system and import into another, follow the procedures below:
To Export a File
- Press and release the Alt key on your keyboard, click File, select Export and CDS Export from the list displayed.
- Click the Patients tab and select the appropriate patients.
- Click the Export Categories tab.
- Check the Accuro extensions (Accuro to Accuro) checkbox is selected.

- Click the Output Format tab, click the Ellipses button
 and specify output file location.
- Click the Export button.
To Import a File
- Press and release the Alt key on your keyboard, click File, select Import and CDS Import from the list displayed.
- Click the Import Files tab and specify import file location.
- Click the Import button.
