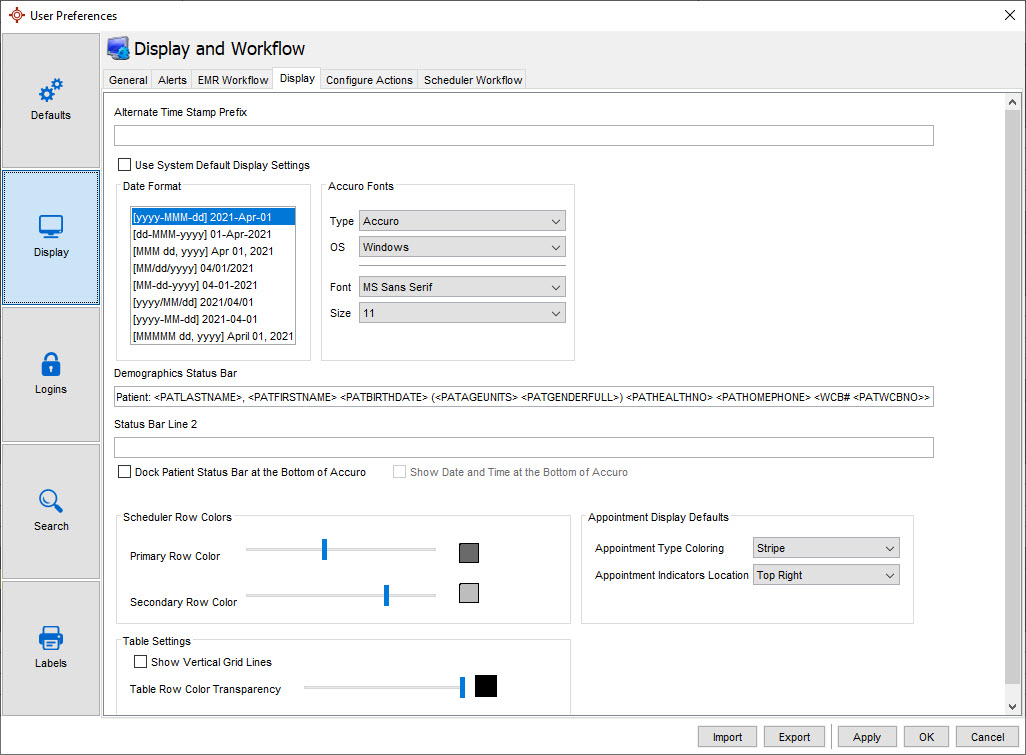
In the display area of Accuro you can change the date format, the Status bar text size and font, add a second line to the Status bar and select the icons you want displayed on the Accuro Navigation bar.
This section is accessible though the Accuro Start Menu > File > User Preferences > Display > Display tab.

Alternate Time Stamp Prefix: Replaces the user name portion of a time stamp insert such as by pressing F12 in a Clinical Note.
Use System Default Display Settings: Select whether the system-wide defaults will override the options on this table.
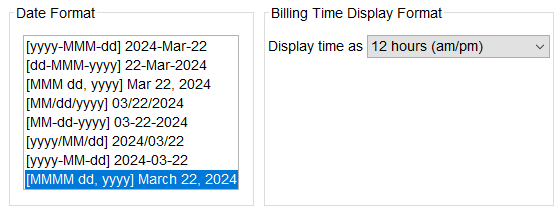
Date Format: Select the format of how dates are displayed.
Type: Select "Accuro" to change fonts within Accuro. Select "Status Bar Font" to change the font for the Demographic Status Bar.
OS: Select the Operating System "Windows" or "Mac OS" for the appropriate fonts in the Font dropdown list below.
Font: Select the font style.
Size: Select the text font size.
Demographics Status Bar: Select demographics to display in the Status Bar by either typing or right-clicking and selecting the desired tags.
Status Bar Line 2: Edit the second line of the Demographic Status Bar by either typing or right-clicking and selecting the desired tags.
Dock Patient Status Bar at the Bottom of Accuro: By default the Patient Status Bar is displayed in the top left of Accuro. This setting moves the Demographics Status Bar to the bottom left of Accuro.
Show Date and Time at the Bottom of Accuro: When the Patient Status Bar is docked at the bottom of Accuro, users can select to display the Date and Time at the bottom of Accuro as well.
Primary Row Color: Select the appointment time slot shading for even hours in the Scheduler.
Secondary Row Color: Select the appointment time slot shading for odd hours in the Scheduler.
Appointment Type Coloring: Select if the Appointment Type Coloring reflects in an appointment in the Scheduler with a "Stripe" on the left side, or the color is applied to the "Full" appointment.
Appointment Indicators Location: Select if the Appointment Indicators, such as arrived, confirmed, or statuses are displayed on the "left" or "right" side of the appointment in the Scheduler.
Show Vertical Grid Lines: Show vertical grid lines in tables.
Table Row Color Transparency: Select the transparency of the Table Rows above.

Display Time As: Select "24 hours (00:00 - 23:59)" to display time in 24 hour format or "12 hours (am/pm)" to display time in 12 hour format for billing. Default selection for this setting is 12 hour clock (am/pm). The selected time format will change only in the following areas: