Priorities, Reasons and Statuses
The Priorities, Reasons and Statuses tab is used to manage appointment priorities, appointment reasons and the status of each appointment.
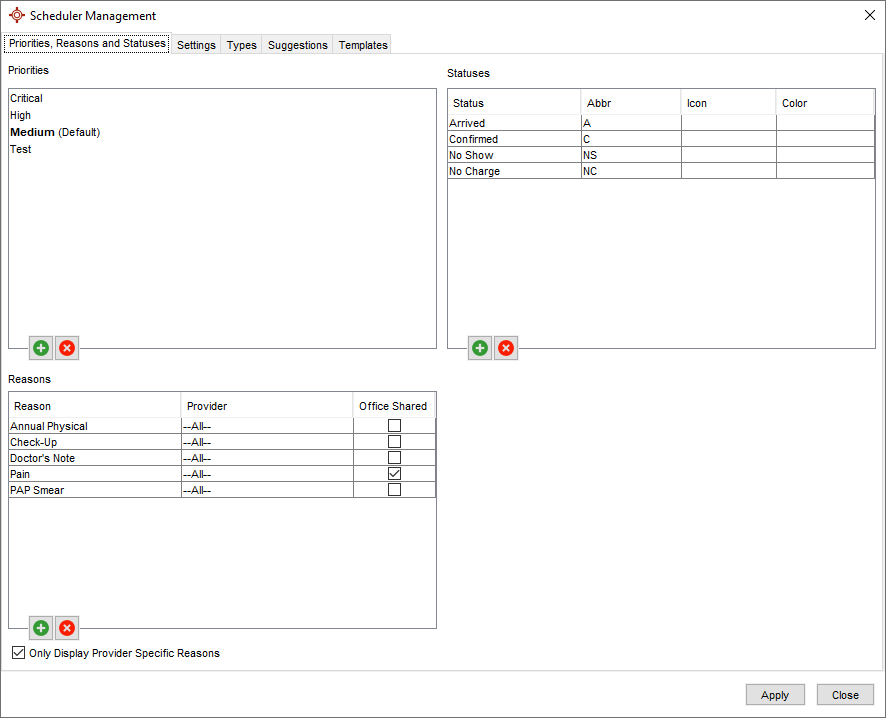
Priorities these are the priority of the appointment. High, Medium and Normal are the ones given my Accuro with Normal being the system Default. Other priorities can be added as needed.
Reasons are used to describe the reason for the appointment. Reasons can be customized and added or removed as needed.
Appointment Types are used to describe the type of appointment.
Statuses are the status of each appointment, whether the patient arrived, didn't show up etc. Arrived, Confirmed, No Show and No Charge are provided as defaults; other statuses can be added if required.
Under the Settings tab you can set Appointment Type Defaults for each Provider. By selecting the appropriate checkbox Appointment Types and Reasons can be shared between providers.
Appointment Reason Defaults can also be set for each Provider on the Settings tab.
Add a Priority
- Press and release the Alt button on the keyboard, click Scheduler and select Scheduler Management from the list displayed.
- Click the Priorities, Reasons and Statuses tab.
- Click Add
 under the Priorities section.
- Type a priority name into the text box.
- Click OK.
- Click Apply to save any changes and Close when finished.
Note: The Priority is set in Appointment Details when creating a new appointment.
Remove a Priority
A priority can only be removed if it is not being used in the Scheduler. If the priority is in use, it cannot be deleted.
- Press and release the Alt button on the keyboard, click Scheduler and select Scheduler Management from the list displayed.
- Click the Priorities, Reasons and Statuses tab.
- Click on a priority to highlight it.
- Click Remove
 and Yes. The priority is deleted and removed from the list
- Click Apply to save any changes and Close when finished.
Add a Status
- Press and release the Alt button on the keyboard, click Scheduler and select Scheduler Management from the list displayed.
- Click the Priorities, Reasons and Statuses tab.
- Click Add under the Statuses section.
- Type a status name into the text box.
- Click OK.
- Enter an abbreviation into the Abbr text field, if desired.
- Click the Icon field and select an icon from the dropdown, if desired, and click OK.
- Click the Color field and select a color, if desired, and click OK.
- Click Apply to save any changes and Close when finished.
Note: The status is set by right-clicking on an Appointment in the Scheduler, and pointing to Status.
Delete a Status
- Press and release the Alt button on the keyboard, click Scheduler and select Scheduler Management from the list displayed.
- Click the Priorities, Reasons and Statuses tab.
- Click on a status to highlight it.
- Click Remove and Yes.
- Click Apply to save any changes and Close when finished.
Add an Appointment Reason
- Press and release the Alt button on the keyboard, click Scheduler and select Scheduler Management from the list displayed.
- Click the Priorities, Reasons and Statuses tab.
- Click Add under the Reasons section.
- Type a reason name into the text box.
- Select a Provider from the list within the Provider field.
- If desired, click the Office Shared checkbox. This will share this reason with other offices within your Accuro database.
- Click Apply to save any changes and Close when finished.
Edit an Appointment Reason
- Press and release the Alt button on the keyboard, click Scheduler and select Scheduler Management from the list displayed.
- Click the Priorities, Reasons and Statuses tab.
- Edit either of the fields of an Appointment Reason by clicking on them and making necessary changes.
- Click Apply.
Delete an Appointment Reason
- Press and release the Alt button on the keyboard, click Scheduler and select Scheduler Management from the list displayed.
- Click the Priorities, Reasons and Statuses tab.
- Click on a reason to highlight it.
- Click Remove and Yes.
- Click Apply to save any changes and Close when finished.
Share Appointment Reasons Between Offices
- Press and release the Alt button on the keyboard, type Scheduler Management in the search field.
- Click the Priorities, Reasons and Statuses tab.
- Click the checkboxes for the Appointment Reasons being shared.
- Click Apply to save the changes.