Day Sheet
The Day Sheet is to view a physician's schedule, enter billing information with the use of macros, create letters, enter notes, and communicate with other staff members.

The Day Sheet is loaded with all the appointments for the day selected in the dropdown list of the Date Navigation bar and for the physician selected in the Physician dropdown list.
The background color of each appointment corresponds to the color chosen for the appointment type.
Any row that has a check mark in the Billing checkbox is completed or approved.
- View Bill: Opens Claim Details screen in a new window.
- Set Macro: Opens the Macro Manager screen in a new window.
- Send Message: Opens the New Follow-up Message screen in a new window.
- Add Task: Adds a task for a person on a patient.
- Approve: For approving a macro and sending it to billing.
- Approve All: For approving all macros and sending them to billing.
- Refresh Day Sheet: Refreshes the current view of the day sheet.
View a Bill in the Day Sheet
- Click the EMR button
 on the Accuro Navigation bar.
- Click the Day Sheet tab.
- Right-click the patient whose claim details you want to see and select View Bill from the list displayed.
Bill for a Patient
For patients seen today, the easiest way to bill is from the Day Sheet.
- Click the EMR button on the Accuro Navigation bar.
- Select the Day Sheet tab if it is not already displayed.
- Right-click on the appropriate patient and select View Bill.
- Complete the billing details as required. Click Save and Close when completed.
Create a Billing Macro in the Day Sheet
Billing is often repetitively creating claims with the same procedure and diagnostic codes. To save time, Billing Macros are available to template common billings.
- Click the EMR button on the Accuro Navigation bar.
- Click the Day Sheet tab.
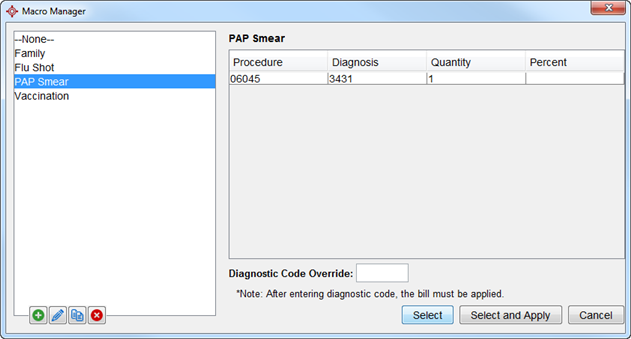
- Right-click on any appointment and select Set Macro. The Macro Manager window is now displayed:
- Click the Add button
 , this opens the Create Macro window.
- Type an appropriate name into the Macro Title text box.
- Type the appropriate code into the Procedure text box or click the Search button
 and search by Code or Keyword.
- Type the appropriate code into the Diagnosis text box or click the Search button and search by Code or Keyword.
- Click OK. The macro now appears in the Macros list.
Attach a Billing Macro to an Appointment in the Day Sheet
- Click the EMR button on the Accuro Navigation bar.
- Click the Day Sheet tab.
- Right-click on the patient you want to attach the billing macro to and select Set Macro.
- Select a macro from the list displayed.
- Click the Select button to apply the claim macro or click Select and Apply to apply the claim macro and complete the claim. Any changes to the claim previously made are removed.
When a macro is selected, the details are shown in the field in the right side table. Once an entry in the Day Sheet has a macro, it must be approved before the macro runs and the bill created.
Open a Template
- Click the EMR button on the Accuro Navigation bar.
- Click the Day Sheet tab.

- Select the Open Template radio button.
- Double-click the appropriate patient to open the template.
- Point to the template you require.
- Click to Select. The template opens with patient associated details loaded.
- Complete the template, as required and click the OK button to save your changes.
Note: Templates can be customized for each clinic using the Template Wizard.
Send a New Follow Up Message
- Click the EMR button on the Accuro Navigation bar.
- Click the Day Sheet tab.
- Right-click on the appropriate patient and select Send Message.
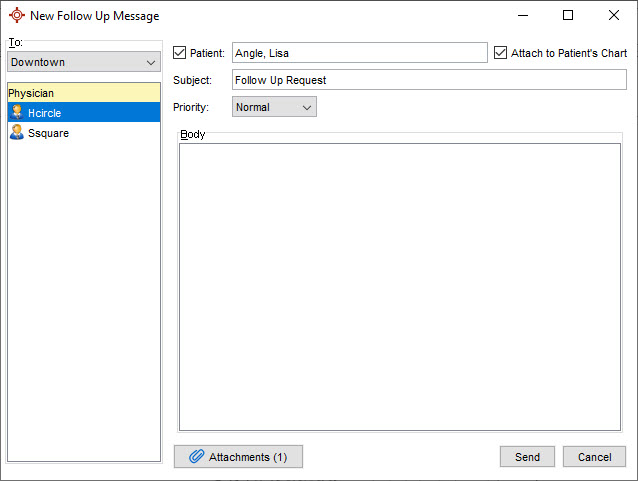
- Click in to the To section and select staff members you want to receive the message.
- If the follow up message is to be attached to the patient's chart, select the Attach to Patient's Chart checkbox.
- Click the dropdown list
 and select the Priority from the list displayed.
- Type in the message in the Body area of the window.
- Click Send to send the message and close the window.
Edit an Appointment and Billing Notes
- Click the EMR button on the Accuro Navigation bar.
- Click the Day Sheet tab.
- Select the Bill Note column in the row of the appointment you want to edit.
- Type in your note.
- Press Tab or click in another field to save your changes.
Print a Day Sheet from the EMR section
- Click the EMR button on the Accuro Navigation bar.
- Click the Day Sheet tab.
- Click the dropdown list and select the Physician from the list displayed.

- Click the Print button
 .
.
- A preview window of your Day Sheet is displayed.
- Click the Print button
 .
.
- Select the appropriate printer and click OK.
View the Chart
- Click the EMR button on the Accuro Navigation bar.
- Click the Day Sheet tab.

- Select the View Chart radio button.
- Double-click the patient for whom you want to View Chart.
Create a New Task
- Click the Home button
 on the Accuro Navigation bar click the Tasks folder.
Or:
Press and release the Alt key, click Tools and select Add/View Patient Tasks from the list displayed
Or:
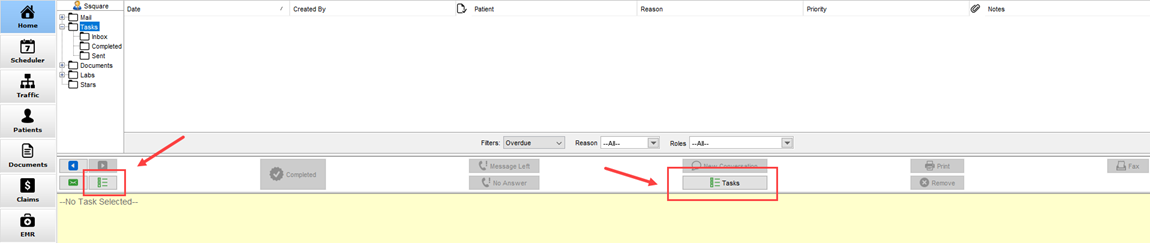
Click the EMR button on the Accuro Navigation bar, click the Day Sheet tab and right-click on the appropriate patient and select Add Task or the New Task button (both are highlighted below).
- The last loaded patient appears in the patient Search Tool. Use the Search Tool to change the patient if required.
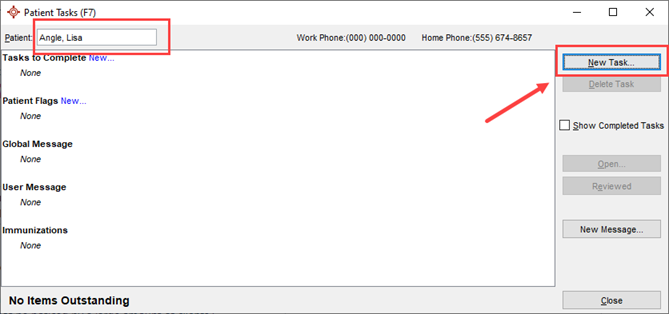
- Click New Task.
- Select the user(s) to assign the task to by clicking on them under the "Assign Task To" list. To select more than one user, hold Ctrl on the keyboard while selecting users.
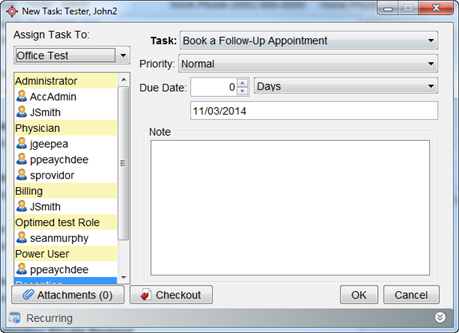
- Select a Task description from the dropdown list.
- Select a Priority from the dropdown list.
- Select a Due Date. You can do this one of two ways:
Select how many days, weeks, months, or years from the dropdown list
Click on the date and select a new date from the popup mini calendar.
- Enter a Note into the text box.
- To include attachments (if necessary), click the Attachments button. This opens the Message Attachments window.
- Select the appropriate attachments by clicking the checkbox beside them.
- Click OK.
Approve a Macro
- Click the EMR button on the Accuro Navigation bar.
- Click the Day Sheet tab.
- Right-click on the appropriate patient appointment and select Approve.
Note: To approve all day sheet entries, right-click on any appointment and select Approve All.
A confirmation message is displayed:

- Click Yes and then OK.
Note: The other way to approve a macro is to select the checkbox to the right of the Bill column of the appointment.

- When the Day Sheet entry is approved, the macro deletes any bills that exist for the selected appointment and creates new ones according to the macro that was selected. The result can be viewed in the Claims section.