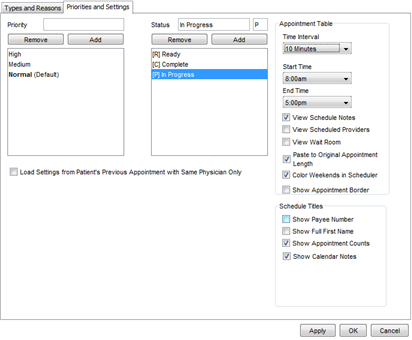
Priorities and settings is the area of Accuro where priority and status options are managed. Select how and what is to be displayed in the Appointment Table and what is displayed in the headings in the Scheduler.

Time Interval Set the time interval to display on the scheduler by selecting a value from the dropdown list.
Set the Start and End Times to display on the scheduler using the dropdown lists
View Schedule Notes: Appointment information and notes are displayed on the scheduler table
View Scheduled Providers: Only providers with scheduled appointments on a particular day are shown in the Scheduler. This removes the Providers option when right-clicking on the Scheduler Head
View Wait Room: A view of the Wait Room can be displayed at the bottom of the main Scheduler window. This option has been superseded by the Traffic Manager section of Accuro.
Paste to Original Appointment Length: Pasted appointments are as long as possible up to the length of the original appointment
Color Weekends in Scheduler: Weekends are displayed in a different color, to make working days easier to distinguish.
Show Appointment Border: Appointments in the scheduler table appear with a black border separating them.
Show Payee Number: The payee number of the Provider is displayed after their name.
Show Full First Name: Providers' full first names will be shown on the Scheduler Header. Un-checking this box Accuro displays only the first initial.
Show Appointment Counts: The number of appointments each Provider has on that day will be shown underneath the Provider's name on the Scheduler Header.
Calendar Notes: A blank space for notes appears on the Scheduler header for each day.
Note: The Priority is set in Appointment Details when creating a new appointment.
A priority can only be removed if it is not being used in the Scheduler. If the priority is in use, it cannot be deleted.
Note: The Priority is set in Appointment Details when creating a new appointment.
Note: The status is set by right-clicking on an Appointment in the Scheduler, and pointing to Status.
Note: The status is set by right-clicking on an Appointment in the Scheduler, and pointing to Status.
If this option is selected the settings from the patient's previous appointment are loaded, but only if that appointment was with the same physician.
The start and end times should be set to the open and closing times of the office. If any providers work shorter hours, block the additional time out when creating your templates.
By setting the View Schedule Notes checkbox appointment information and notes are displayed on the scheduler table
If the View Scheduled Providers checkbox is selected only providers with scheduled appointments on a particular day are shown in the Scheduler. This removes the Providers option when right-clicking on the Scheduler Header.
Note: This function has been superseded by the Traffic Manager which can be found by clicking the Traffic button ![]() on the Accuro Navigation bar.
on the Accuro Navigation bar.
Note: The Wait Room function has been superseded by the Traffic Manager which can be found by clicking the Traffic button ![]() on the Accuro Navigation bar.
on the Accuro Navigation bar.